System 75 Small-Cabinet to R8si (Blowback)
Task List: System 75 Small Cabinet to R8si
312
SI Installation and Upgrades
June 2004
2
Connect the power cable to the wall plug.
Return to Task List
Close upgraded PPN stack without earthquake protection [75 small upgrade]
Return to Task List
NOTE:
This procedure is for systems not requiring earthquake protection.
1
Install the front door on each cabinet.
2
Install a DEFINITY label on each existing port cabinet.
3
Install the top and bottom rear covers.
— Verify that the correct rear covers are installed on the new control cabinets.
— Do not use these rear covers on the port cabinets.
Return to Task List
Close upgraded PPN stack with earthquake protection [75 small upgrade]
Return to Task List
NOTE:
This procedure is for systems requiring earthquake protection.
1
Install the upper and lower rear covers.
— Use all the screws except the screws that run along the top and bottom of the cabinet. Do
not tighten the screws.
— Note that on a critical-reliability R7si or R8si, the rear covers for the control cabinets need
2 detents. One is for the TDM/LAN cable and the other is for the ICC cables.
2
Line up the 4 holes in the ground plate with the 4 holes at the bottom of the lower rear cover of the
upper cabinet. Install the 4 screws but do not tighten them.
3
Line up the ground plate with the top holes of the upper rear cover of the lower cabinet. Install the
4 screws but do not tighten them.
4
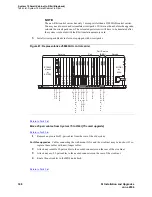
At the front of the cabinet, line up the earthquake front plate with the holes at the top and bottom
of the cabinet. See
Figure 85
. Install the 8 screws but do not tighten them.
5
Tighten all screws.
6
Repeat
Step 1
through
Step 5
for the remaining cabinets.
7
Install the front door on each cabinet.
8
Install a DEFINITY label on each existing port cabinet.
Содержание MCC1
Страница 38: ...Upgrades to Avaya Commnication Manager Made Easy Before you start 38 SI Installation and Upgrades June 2004 ...
Страница 326: ...Installation for MCC1 Multicarrier Cabinets Made Easy 326 SI Installation and Upgrades June 2004 ...
Страница 362: ... Single Carrier Cabinets Made Easy 362 SI Installation and Upgrades June 2004 ...
Страница 498: ...Test the System LED Indicators 498 SI Installation and Upgrades June 2004 ...
Страница 650: ...Add IP Solutions Task list Upgrade a TN802 to a TN802B 650 SI Installation and Upgrades June 2004 ...
Страница 692: ...Install and Administer Trunks Add TN1654 DS1 Converter r only 692 SI Installation and Upgrades June 2004 ...
Страница 770: ...Connecting and Handling Fiber Optic Cables Cleaning Fiber Optic Cables 770 SI Installation and Upgrades June 2004 ...
Страница 784: ...Connector and Cable Diagrams Pinout Charts DS1 Interface Cable H600 307 784 SI Installation and Upgrades June 2004 ...
Страница 792: ...UPS Installation for SCC1 EPN A Carrier Cabinet Task List Install UPS 792 SI Installation and Upgrades June 2004 ...
Страница 874: ...Index Z 874 SI Installation and Upgrades June 2004 ...


