System 75 XE to R8si (Blowback)
Task List: System 75 XE to R8si
SI Installation and Upgrades
227
June 2004
Task List: System 75 XE to R8si
Use this task list to upgrade a System 75 XE to R8si. Steps are provided for
•
Single cabinets (PPN)
•
Dual cabinets (EPN)
•
Earthquake protection
Ensure that these tasks are complete before the upgrade visit:
1
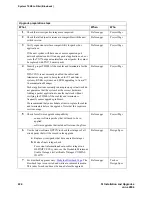
Verify the required hardware [75 XE upgrade]
2
Provide the required tools [75 XE upgrade]
Perform these tasks during the upgrade visit:
3
Unpack and inspect control cabinet for damage [75 XE upgrade]
4
Verify software load [75 XE upgrade]
5
Verify system status [75 XE upgrade]
Record any customer-placed busy-outs.
6
Disable scheduled maintenance and alarm origination [75 XE upgrade]
7
Save translations to tape [75 XE upgrade]
8
Verify power and grounding and check for power transfer stations [75 XE upgrade]
9
Modify external alarm connections [75 XE upgrade]
10
Label cables [75 XE upgrade]
11
For systems so equipped:
Shut down DEFINITY AUDIX system [75 XE upgrade]
12
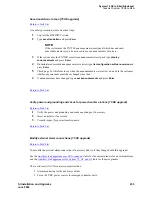
Power down PPN [75 XE upgrade]
13
Disconnect power and grounding and SAT terminal [75 XE upgrade]
14
Verify power failure stations (if present) [75 XE upgrade]
15
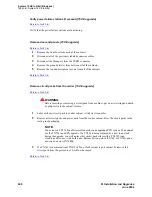
Remove door and panels [75 XE upgrade]
(EPN only)
16
Remove circuit packs from the carrier [75 XE upgrade]
17
Disconnect TDM cables [75 XE upgrade]
18
Remove the control cabinet [75 XE upgrade]
19
Install new control cabinet [75 XE upgrade]
or
Install new control cabinet with earthquake
protection [75 XE upgrade]
20
Install enhanced control cabinet (duplicated system) [75 XE upgrade]
21
Install port cabinets [75 XE upgrade]
22
Install circuit packs into the port cabinets [75 XE upgrade]
(If a TN2182 is installed, do not
reinstall the TN756.)
23
Change cabinet address plugs [75 XE upgrade]
(PPN upgrade only)
24
Move 25-pair cables from System 75 to R8si [75 XE upgrade]
25
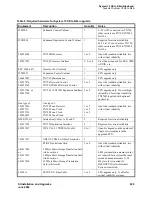
Install TDM/LAN bus terminators [75 XE upgrade]
26
Connect TDM/LAN cables and ICC cables for PPN Upgrade [75 XE upgrade]
27
Connect TDM/LAN Cables and ICC Cables for EPN Upgrade [75 XE upgrade]
Содержание MCC1
Страница 38: ...Upgrades to Avaya Commnication Manager Made Easy Before you start 38 SI Installation and Upgrades June 2004 ...
Страница 326: ...Installation for MCC1 Multicarrier Cabinets Made Easy 326 SI Installation and Upgrades June 2004 ...
Страница 362: ... Single Carrier Cabinets Made Easy 362 SI Installation and Upgrades June 2004 ...
Страница 498: ...Test the System LED Indicators 498 SI Installation and Upgrades June 2004 ...
Страница 650: ...Add IP Solutions Task list Upgrade a TN802 to a TN802B 650 SI Installation and Upgrades June 2004 ...
Страница 692: ...Install and Administer Trunks Add TN1654 DS1 Converter r only 692 SI Installation and Upgrades June 2004 ...
Страница 770: ...Connecting and Handling Fiber Optic Cables Cleaning Fiber Optic Cables 770 SI Installation and Upgrades June 2004 ...
Страница 784: ...Connector and Cable Diagrams Pinout Charts DS1 Interface Cable H600 307 784 SI Installation and Upgrades June 2004 ...
Страница 792: ...UPS Installation for SCC1 EPN A Carrier Cabinet Task List Install UPS 792 SI Installation and Upgrades June 2004 ...
Страница 874: ...Index Z 874 SI Installation and Upgrades June 2004 ...

