Adjuncts and Peripherals
DS1/T1 CPE loopback jack
SI Installation and Upgrades
819
June 2004
Busying out the DS1 circuit pack
Now take the DS1 circuit out of service.
1
Once you are sure that the DS1 circuit pack and ICSU are functioning correctly, go to the
management terminal and busy out the DS1 circuit pack by typing
busyout board UUCSS
,
where
UU
is the cabinet number,
C
is the carrier letter, and
SS
is the slot number of the DS1
board.
Administering the DS1 for the test
1
At the management terminal, open the DS1 administration form. Type
change ds1 UUCSS
,
where
UU
is the cabinet number,
C
is the carrier letter, and
SS
is the slot number of the DS1
board.
2
Make sure that the
near-end csu type
field is set to
integrated
.
3
Change to page 2 of the DS1 administration form, and confirm that the value of the
TX LBO
field is
0dB
.
4
If the value of the
TX LBO
field is not
0dB
, record the current value. Then set the
TX LBO
field
to 0dB for testing.
5
Press Enter to make the changes, CANCEL to quit without changes.
Testing the integrity of the loopback circuit
Now perform the first part of the actual loopback test.
1
At the management terminal, enter
test ds1-loop location cpe-loopback-jack
.
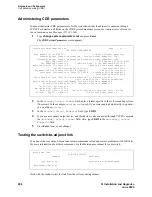
The loopback jack powers up. Active, DS1 facility alarms (if any) clear. After about 20 seconds,
the first set of results appears on the terminal.
2
If
FAIL
appears on the terminal display, there may be a fault in the wiring between the ICSU and
the loopback jack or the loopback jack may itself be faulty. Isolate the problem by replacing the
loopback jack and repeating
Step 1
.
3
If
FAIL
still appears after the loopback jack has been replaced, suspect a wiring problem. Replace
the cable between the ICSU and the loopback jack. Then repeat
Step 1
.
4
When
PASS
appears on the terminal, proceed with the second part of the test, checking the
integrity of transmitted data.
Testing the integrity of data sent over the loop
Now perform the second part of the test, checking for data errors.
NOTE:
The loss of signal (LOS) alarm (demand test #138) is not processed during this test while
the 3-in-24 pattern is active.
Clearing the results of previous tests
1
Zero out the bit-error counter. At the management terminal, enter
clear meas ds1 loop
location
.
2
Zero out the performance measurement counter. At the management terminal, enter
clear meas
ds1 log location
.
3
Zero out the ESF error count. At the management terminal, enter
clear meas ds1 esf
location
.
Содержание MCC1
Страница 38: ...Upgrades to Avaya Commnication Manager Made Easy Before you start 38 SI Installation and Upgrades June 2004 ...
Страница 326: ...Installation for MCC1 Multicarrier Cabinets Made Easy 326 SI Installation and Upgrades June 2004 ...
Страница 362: ... Single Carrier Cabinets Made Easy 362 SI Installation and Upgrades June 2004 ...
Страница 498: ...Test the System LED Indicators 498 SI Installation and Upgrades June 2004 ...
Страница 650: ...Add IP Solutions Task list Upgrade a TN802 to a TN802B 650 SI Installation and Upgrades June 2004 ...
Страница 692: ...Install and Administer Trunks Add TN1654 DS1 Converter r only 692 SI Installation and Upgrades June 2004 ...
Страница 770: ...Connecting and Handling Fiber Optic Cables Cleaning Fiber Optic Cables 770 SI Installation and Upgrades June 2004 ...
Страница 784: ...Connector and Cable Diagrams Pinout Charts DS1 Interface Cable H600 307 784 SI Installation and Upgrades June 2004 ...
Страница 792: ...UPS Installation for SCC1 EPN A Carrier Cabinet Task List Install UPS 792 SI Installation and Upgrades June 2004 ...
Страница 874: ...Index Z 874 SI Installation and Upgrades June 2004 ...


