Add IP Solutions
Task list: Upgrade a TN802 to a TN802B
SI Installation and Upgrades
647
June 2004
Upgrade to TN802B (R10)
Return to Task List
NOTE:
The upgrade takes about 20 minutes
1
Insert the flash disk into the right most slot on the TN802B IP Interface. On the terminal, a dialog
box assigns a drive letter; the default is (D:).
2
Right click on
Start > Explore
to open the Windows NT Explore pane and select the drive letter
indicated in the previous step.
3
Double-click on
Medpro
and select the
Setup
icon.
4
Follow the
Install Shield
procedure to transfer all the necessary files to the TN802 IP
Interface.
5
In the Finish dialog box, select
I will restart later
; DO NOT SELECT
Restart
computer
.
This would be a good time to read the Readme.txt file.
6
Click on Start > Settings > Control Panel > Services.
7
Select
IP Trunk
and click on
Startup
. DO NOT CLICK ON
Start
.
8
Under
Startup Type
, select
Disabled
and click OK to disable IP Trunk mode.
NOTE:
If IP trunk and MedPro services are both set to automatic, the TN802B defaults to IP
Trunk and MedPro features cannot be used.
9
Select
MedPro
and click on
Startup
. DO NOT CLICK ON
Start
.
10
Under
Startup Type
, select
Automatic
and click OK to enable MedPro mode.
!
WARNING:
When connected remotely via pcANYWHERE, only use the pcANYWHERE Restart
Host Computer button on the toolbar to restart Windows NT.
11
Click Start > Shut Down and select
Restart the computer?
or on the TN802 circuit pack:
Press the recessed reset button on the faceplate (see
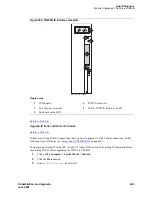
Figure 249, TN802B IP Interface faceplate,
on page 632) of the TN802B IP Interface until the LCD shows a flashing
MSHUT *
. When the
flashing stops and the asterisk disappears (about 2 min), reseat the circuit pack to restart the
system.
or on the SAT:
f
Type
busyout board
UUCSS
and press Enter.
g
Type
reset board
UUCSS
and press Enter.
h
Type
release board
UUCSS
and press Enter.
Once the system is completely initialized, the LCD reads
MEDPRO *
.
12
Affix the new TN802B label to the circuit pack.
Содержание MCC1
Страница 38: ...Upgrades to Avaya Commnication Manager Made Easy Before you start 38 SI Installation and Upgrades June 2004 ...
Страница 326: ...Installation for MCC1 Multicarrier Cabinets Made Easy 326 SI Installation and Upgrades June 2004 ...
Страница 362: ... Single Carrier Cabinets Made Easy 362 SI Installation and Upgrades June 2004 ...
Страница 498: ...Test the System LED Indicators 498 SI Installation and Upgrades June 2004 ...
Страница 650: ...Add IP Solutions Task list Upgrade a TN802 to a TN802B 650 SI Installation and Upgrades June 2004 ...
Страница 692: ...Install and Administer Trunks Add TN1654 DS1 Converter r only 692 SI Installation and Upgrades June 2004 ...
Страница 770: ...Connecting and Handling Fiber Optic Cables Cleaning Fiber Optic Cables 770 SI Installation and Upgrades June 2004 ...
Страница 784: ...Connector and Cable Diagrams Pinout Charts DS1 Interface Cable H600 307 784 SI Installation and Upgrades June 2004 ...
Страница 792: ...UPS Installation for SCC1 EPN A Carrier Cabinet Task List Install UPS 792 SI Installation and Upgrades June 2004 ...
Страница 874: ...Index Z 874 SI Installation and Upgrades June 2004 ...


