Install and Wire Telephones
Task List: Attendant Console Procedures
520
SI Installation and Upgrades
June 2004
Return to Task List
Connect Power Distribution Unit External Alarm Wires
Return to Task List
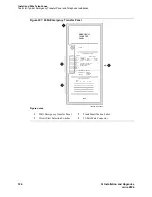
The external alarm plug should already be connected to the J58890CH-1 Power Distribution Unit. The
pinout for the connector is shown in
External Alarm Connector Pinout
on page 521.
NOTE:
RS-232 alarms (RXD, DTR, DSR, TXD, RS-232 GRD, and RTS) are not supported on the
BU3200A Battery Interface Unit.
1
Choose an alarm to connect (such as Battery Interface Failure).
2
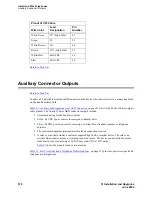
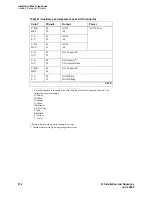
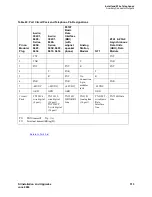
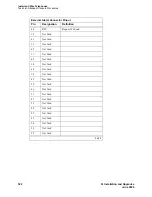
Choose the port circuit pack to use and its carrier and slot number (from
Table 27, Port Circuit
Pack and Telephone Pin Designations,
on page 523). For example TN2183 Analog Line, Cabinet
1, Carrier C, Slot 1.
3
Choose a port circuit on the port circuit pack, for example Port 3.
4
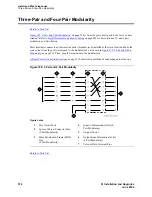
Install cross-connect jumpers to connect the named pins from the alarm wires to the appropriate
pins on the port circuit pack.
NOTE:
It is recommended that the RFA, ACF, and BIF alarm leads be connected to the major
alarm device and the BOD alarm leads be connected to the minor alarm device.
5
Connect the major and minor alarm devices to the appropriate cross- connect pins on the MDF.
6
Administer the alarms using the Administrator’s Guide for Avaya Communication Manager (555-
233-506).
Table 25: Alarm Output at AUX Connector
Color
AUX Connector
Violet-Green
EXTALMA (Pin 48) Alarm Output
Green-Violet
EXTALMB (Pin 23) (Ground) Alarm Output
Table 26: Emergency Transfer and Auxiliary Power
Color
AUX Connector
Black-Green
XFER48 (Emergency Transfer) (Pin 36)
Green-Black
Ground (Pin 11)
Black-Slate
ACC48A (Adjunct -48 VDC) (Pin 19)
Slate-Black
Ground (Pin 44)
Содержание MCC1
Страница 38: ...Upgrades to Avaya Commnication Manager Made Easy Before you start 38 SI Installation and Upgrades June 2004 ...
Страница 326: ...Installation for MCC1 Multicarrier Cabinets Made Easy 326 SI Installation and Upgrades June 2004 ...
Страница 362: ... Single Carrier Cabinets Made Easy 362 SI Installation and Upgrades June 2004 ...
Страница 498: ...Test the System LED Indicators 498 SI Installation and Upgrades June 2004 ...
Страница 650: ...Add IP Solutions Task list Upgrade a TN802 to a TN802B 650 SI Installation and Upgrades June 2004 ...
Страница 692: ...Install and Administer Trunks Add TN1654 DS1 Converter r only 692 SI Installation and Upgrades June 2004 ...
Страница 770: ...Connecting and Handling Fiber Optic Cables Cleaning Fiber Optic Cables 770 SI Installation and Upgrades June 2004 ...
Страница 784: ...Connector and Cable Diagrams Pinout Charts DS1 Interface Cable H600 307 784 SI Installation and Upgrades June 2004 ...
Страница 792: ...UPS Installation for SCC1 EPN A Carrier Cabinet Task List Install UPS 792 SI Installation and Upgrades June 2004 ...
Страница 874: ...Index Z 874 SI Installation and Upgrades June 2004 ...


