Adjuncts and Peripherals
Call detail recording (CDR)
804
SI Installation and Upgrades
June 2004
4
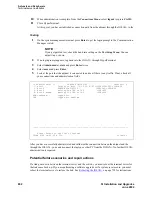
The
Local Port
field defaults to
0
for all client applications. You cannot make an entry in this
field.
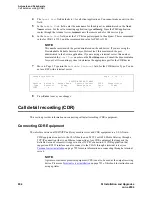
5
In the
Remote Node
field, enter the node name for the adjunct, as administered on the Node
Names screen. For the call accounting application, type callacctg. Since the PMS application
routes through the terminal server, termserver is the remote node for this service type.
6
In the
Remote Port
field, enter the TCP listen port assigned to the adjunct. The recommended
value for CDR1 is 5101, and the recommended value for PMS is 5103.
NOTE:
This number must match the port administered on the end device. If you are using the
Downloadable Reliable Session-Layer Protocol tool, this must match the port
administered in the Server application. If you are using a terminal server, this number
must match the
Local Port
number on the Port Setup menu. Consult the documentation
for your Call Accounting system to determine the appropriate port for the CDR device.
7
Move to Page 3. Type n in the
Reliable Protocol
field for the CDR Service Type. You do
not use RSP with a terminal server.
8
Press Enter to save your changes.
Call detail recording (CDR)
This section provides information on connecting call detail recording (CDR) equipment.
Connecting CDR Equipment
The interface between a DEFINITY and Avaya media server and CDR equipment is a C-LAN card.
CDR equipment connects to the CLAN board on an MCC1 or G650 Media Gateway through a
TCP/IP connection (that is, an Ethernet connection). Any CDR equipment that supports the
Reliable Session Protocol will support a direct TCP/IP connection. A CDR application that
supports an RS232 interface can also connect to the CLAN through a terminal server (see
Terminal server installation
on page 793 for more information on connecting through a terminal
server).
NOTE:
A printer or customer premises equipment (CPE) can also be used as the output receiving
device. Please see
Terminal server installation
on page 793 of this book for instructions on
using a printer.
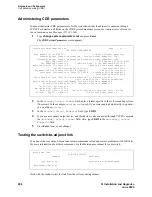
change
ip-services
Page 3 of 3
SESSION LAYER TIMERS
Service
Reliable
Packet Resp
Session Connect
SPDU
Connectivity
Type
Protocol
Timer
Message Cntr
Cntr
Timer
CDR1
n
3
1
1
1
Содержание MCC1
Страница 38: ...Upgrades to Avaya Commnication Manager Made Easy Before you start 38 SI Installation and Upgrades June 2004 ...
Страница 326: ...Installation for MCC1 Multicarrier Cabinets Made Easy 326 SI Installation and Upgrades June 2004 ...
Страница 362: ... Single Carrier Cabinets Made Easy 362 SI Installation and Upgrades June 2004 ...
Страница 498: ...Test the System LED Indicators 498 SI Installation and Upgrades June 2004 ...
Страница 650: ...Add IP Solutions Task list Upgrade a TN802 to a TN802B 650 SI Installation and Upgrades June 2004 ...
Страница 692: ...Install and Administer Trunks Add TN1654 DS1 Converter r only 692 SI Installation and Upgrades June 2004 ...
Страница 770: ...Connecting and Handling Fiber Optic Cables Cleaning Fiber Optic Cables 770 SI Installation and Upgrades June 2004 ...
Страница 784: ...Connector and Cable Diagrams Pinout Charts DS1 Interface Cable H600 307 784 SI Installation and Upgrades June 2004 ...
Страница 792: ...UPS Installation for SCC1 EPN A Carrier Cabinet Task List Install UPS 792 SI Installation and Upgrades June 2004 ...
Страница 874: ...Index Z 874 SI Installation and Upgrades June 2004 ...


