Install and Connect SCC1 (Single-Carrier Cabinets)
Task List: Install a J58890CG DC Power Distribution Unit
SI Installation and Upgrades
381
June 2004
Connect Optional Battery Leads
Return to Task List
To prevent the internal batteries from discharging, the Control Cabinet is shipped with the battery leads
disconnected.
1
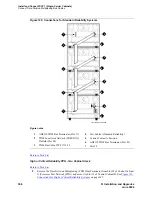
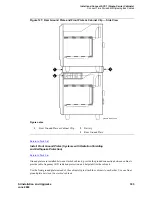
Set the circuit breakers OFF. See
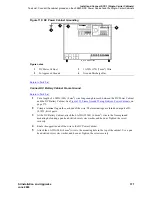
Figure 118, Control Cabinet Battery Location — Right Side,
on
page 381.
2
Connect the battery leads. The battery is near the top of the carrier toward the front-right. The
battery leads are located next to the battery and are accessible from the front of the cabinet.
Figure 118: Control Cabinet Battery Location — Right Side
Return to Task List
Figure notes
1
Battery
2
Battery Lead Connector
3
Circuit Breakers (Located Between plates)
4
Cabinet Single-Point Ground Block
3
4
1
2
4_3 LJK 031096
Содержание MCC1
Страница 38: ...Upgrades to Avaya Commnication Manager Made Easy Before you start 38 SI Installation and Upgrades June 2004 ...
Страница 326: ...Installation for MCC1 Multicarrier Cabinets Made Easy 326 SI Installation and Upgrades June 2004 ...
Страница 362: ... Single Carrier Cabinets Made Easy 362 SI Installation and Upgrades June 2004 ...
Страница 498: ...Test the System LED Indicators 498 SI Installation and Upgrades June 2004 ...
Страница 650: ...Add IP Solutions Task list Upgrade a TN802 to a TN802B 650 SI Installation and Upgrades June 2004 ...
Страница 692: ...Install and Administer Trunks Add TN1654 DS1 Converter r only 692 SI Installation and Upgrades June 2004 ...
Страница 770: ...Connecting and Handling Fiber Optic Cables Cleaning Fiber Optic Cables 770 SI Installation and Upgrades June 2004 ...
Страница 784: ...Connector and Cable Diagrams Pinout Charts DS1 Interface Cable H600 307 784 SI Installation and Upgrades June 2004 ...
Страница 792: ...UPS Installation for SCC1 EPN A Carrier Cabinet Task List Install UPS 792 SI Installation and Upgrades June 2004 ...
Страница 874: ...Index Z 874 SI Installation and Upgrades June 2004 ...


