Install and Connect SCC1 (Single-Carrier Cabinets)
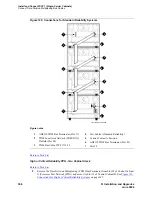
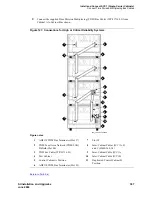
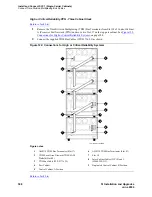
Task List: Connect the cabinet grounds on the J58890R DC Power Cabinet and the Single-Carrier Cabinets
384
SI Installation and Upgrades
June 2004
Set the Ringer Frequency
Return to Task List
CAUTION:
When adding or replacing any hardware, be sure to ground yourself against electrostatic
discharge (ESD) by wearing a grounded wrist strap.
The default ringer frequency setting on the 1217A power supply for North America is 20 Hz and the
international setting can be either 20 Hz or 25 Hz. To set the ringer frequency on the 1217A power
supply:
1
Power down AUDIX and any other circuit pack that might be running an application.
2
Power down the cabinet.
3
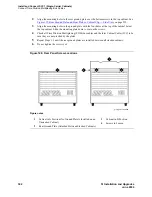
Release both latches on the power supply and slide the unit out of the cabinet.
4
Observe the ring frequency switch label on the side of the power supply and locate the switch on
the bottom.
5
Set the ring frequency select switch to the appropriate frequency setting.
6
Slide the power supply back into the slot and ensure that both latches snap closed.
Return to Task List
Connect the Power Cord into the Power Receptacle
Return to Task List
1
Provide one receptacle per Single-Carrier Cabinet.
2
Verify the circuit breakers are OFF.
3
Plug the cabinet AC power cord into the AC power receptacle on the rear of each cabinet.
4
Plug the opposite end of each AC power cord into the appropriate AC power receptacle in the
equipment room.
NOTE:
Loop the excess cord and tie wrap it to the back cover to prevent accidental unplugging.
Return to Task List
Содержание MCC1
Страница 38: ...Upgrades to Avaya Commnication Manager Made Easy Before you start 38 SI Installation and Upgrades June 2004 ...
Страница 326: ...Installation for MCC1 Multicarrier Cabinets Made Easy 326 SI Installation and Upgrades June 2004 ...
Страница 362: ... Single Carrier Cabinets Made Easy 362 SI Installation and Upgrades June 2004 ...
Страница 498: ...Test the System LED Indicators 498 SI Installation and Upgrades June 2004 ...
Страница 650: ...Add IP Solutions Task list Upgrade a TN802 to a TN802B 650 SI Installation and Upgrades June 2004 ...
Страница 692: ...Install and Administer Trunks Add TN1654 DS1 Converter r only 692 SI Installation and Upgrades June 2004 ...
Страница 770: ...Connecting and Handling Fiber Optic Cables Cleaning Fiber Optic Cables 770 SI Installation and Upgrades June 2004 ...
Страница 784: ...Connector and Cable Diagrams Pinout Charts DS1 Interface Cable H600 307 784 SI Installation and Upgrades June 2004 ...
Страница 792: ...UPS Installation for SCC1 EPN A Carrier Cabinet Task List Install UPS 792 SI Installation and Upgrades June 2004 ...
Страница 874: ...Index Z 874 SI Installation and Upgrades June 2004 ...


