System 75 Small-Cabinet to R8si (Blowback)
Task List: System 75 Small Cabinet to R8si
296
SI Installation and Upgrades
June 2004
The
SHUTDOWN Completed
message displays when the AUDIX is successfully shutdown. This
takes about 2 minutes.
CAUTION:
If leaving AUDIX System in the carrier, back it out about 2 in. (5 cm) to eliminate the
possibility of damage due to power surges.
Return to Task List
Power down [75 small upgrade]
Return to Task List
CAUTION:
Powering down the control cabinet causes loss of important system data, such as BCMS
data, records of queued ACD calls, Automatic Wakeup requests, and Do Not Disturb
requests. BCMS data cannot be stored to or retrieved from tape or flash.
1
Set the circuit breaker to OFF.
Return to Task List
Disconnect power and grounding [75 small upgrade]
Return to Task List
Disconnect the power cable from the wall plug.
Verify power failure [75 small upgrade]
Return to Task List
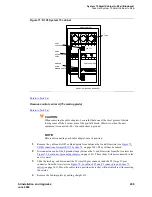
During routine operation, the ground for the emergency transfer stations is derived from the system’s
auxiliary cable. Disconnect this ground during the upgrade to disable the stations. A ground strap is run to
the emergency transfer panel. Connect this strap shortly after removing power and disconnect it just
before restoring power to the upgraded system.
Return to Task List
Open/remove doors and panels [75 small upgrade]
Return to Task List
1
Remove the front door from the cabinet, if desired.
2
With the cable retainer in front of you and the part number visible (4B or 4C), locate the slot that
is almost vertical. (This slot is adjacent to the part number.) Insert a flat-blade screwdriver with a
wide blade (1/4-inch is recommended) into the slot, and twist the screwdriver. The cable retainer
will snap open easily so that the cable can be removed.
3
At the cabinet, disconnect the previously labeled cables associated with the carrier to be removed.
Содержание MCC1
Страница 38: ...Upgrades to Avaya Commnication Manager Made Easy Before you start 38 SI Installation and Upgrades June 2004 ...
Страница 326: ...Installation for MCC1 Multicarrier Cabinets Made Easy 326 SI Installation and Upgrades June 2004 ...
Страница 362: ... Single Carrier Cabinets Made Easy 362 SI Installation and Upgrades June 2004 ...
Страница 498: ...Test the System LED Indicators 498 SI Installation and Upgrades June 2004 ...
Страница 650: ...Add IP Solutions Task list Upgrade a TN802 to a TN802B 650 SI Installation and Upgrades June 2004 ...
Страница 692: ...Install and Administer Trunks Add TN1654 DS1 Converter r only 692 SI Installation and Upgrades June 2004 ...
Страница 770: ...Connecting and Handling Fiber Optic Cables Cleaning Fiber Optic Cables 770 SI Installation and Upgrades June 2004 ...
Страница 784: ...Connector and Cable Diagrams Pinout Charts DS1 Interface Cable H600 307 784 SI Installation and Upgrades June 2004 ...
Страница 792: ...UPS Installation for SCC1 EPN A Carrier Cabinet Task List Install UPS 792 SI Installation and Upgrades June 2004 ...
Страница 874: ...Index Z 874 SI Installation and Upgrades June 2004 ...


