Bring the System Online
Task List: Administer the System
SI Installation and Upgrades
481
June 2004
13
In the
Data Lock
field, choose:
— YES for products with ASG enabled
— NO for all others
14
In the
Dialing Type
field choose the dialing type that the product will use to report alarms:
— DON’T CHANGE to leave the product’s dialing type unchanged
— TONE for DTMF dialing
— PULSE for rotary or pulse dialing
15
In the
Alarm Origination
field choose:
— DON’T CHANGE to leave the product’s current alarm origination status unchanged (the
common choice for upgrades).
— YES to enable alarm origination.
— NO for no alarm origination.
16
In the
Alarm Destination
field, choose
— DON’T CHANGE to leave the product’s currently-administered alarm origination number
unchanged (the common choice for upgrades).
— SET NUMBER TO and type the complete alarm destination telephone number, including
any dialing prefix (for example, “9” or “*9”). The default value in this field is the TSO-
Denver number (18005353573).
17
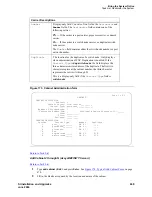
Click on the Continue Registration button at the bottom of the page.
ART begins automatically registering the product and displays progress messages to indicate the
current status.
CAUTION:
DO NOT exit your browser or click on the Refresh, Back, Stop, or Home buttons while
ART displays these progress messages.
If you have to abort your registration, click on the Abort Session button that appears with
one of the progress messages.
If the preceding steps have been completed successfully, ART displays the DEFINITY Upgrade
Registration Report.
18
Review the information displayed in the report.
If any of the data are incorrect, contact the DBA Group (1-800-248-1234, selecting prompt, 2,
prompt 6, then prompt 2) immediately for assistance.
19
Save the DEFINITY Upgrade Registration Report in a file for future reference or print the report
and keep the copy.
Содержание MCC1
Страница 38: ...Upgrades to Avaya Commnication Manager Made Easy Before you start 38 SI Installation and Upgrades June 2004 ...
Страница 326: ...Installation for MCC1 Multicarrier Cabinets Made Easy 326 SI Installation and Upgrades June 2004 ...
Страница 362: ... Single Carrier Cabinets Made Easy 362 SI Installation and Upgrades June 2004 ...
Страница 498: ...Test the System LED Indicators 498 SI Installation and Upgrades June 2004 ...
Страница 650: ...Add IP Solutions Task list Upgrade a TN802 to a TN802B 650 SI Installation and Upgrades June 2004 ...
Страница 692: ...Install and Administer Trunks Add TN1654 DS1 Converter r only 692 SI Installation and Upgrades June 2004 ...
Страница 770: ...Connecting and Handling Fiber Optic Cables Cleaning Fiber Optic Cables 770 SI Installation and Upgrades June 2004 ...
Страница 784: ...Connector and Cable Diagrams Pinout Charts DS1 Interface Cable H600 307 784 SI Installation and Upgrades June 2004 ...
Страница 792: ...UPS Installation for SCC1 EPN A Carrier Cabinet Task List Install UPS 792 SI Installation and Upgrades June 2004 ...
Страница 874: ...Index Z 874 SI Installation and Upgrades June 2004 ...


