System 75 Small-Cabinet to R8si (Blowback)
Task List: System 75 Small Cabinet to R8si
306
SI Installation and Upgrades
June 2004
11
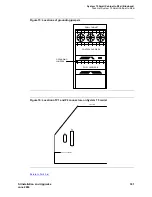
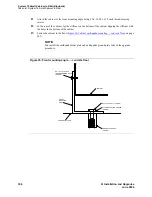
Attach the cabinet to the front mounting angle using 4 No. 12-24 by 1/2-inch thread-forming
screws.
12
In the rear of the cabinet, lay the stiffener on the bottom of the cabinet aligning the stiffener with
the holes in the bottom of the cabinet.
13
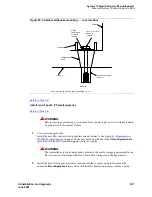
Fasten the cabinet to the floor (
Figure 80, Cabinet earthquake mounting — concrete floor,
on page
307).
NOTE:
You install the earthquake front plate and earthquake ground plate later in the upgrade
procedure.
Figure 79: Front mounting angle
—
concrete floor
CABINET
3/8-16 X 1.25 BOLT (2 REQ’D)
THREAD-FORMING SCREW
CONCRETE ANCHOR
NYLON INSULATING WASHER
(2 REQ’D)
NO. 12-24 X 1/2 INCH
(4 REQ’D)
FRONT
MOUNTING
ANGLE
CONCRETE FLOOR
(2 REQ’D)
Содержание MCC1
Страница 38: ...Upgrades to Avaya Commnication Manager Made Easy Before you start 38 SI Installation and Upgrades June 2004 ...
Страница 326: ...Installation for MCC1 Multicarrier Cabinets Made Easy 326 SI Installation and Upgrades June 2004 ...
Страница 362: ... Single Carrier Cabinets Made Easy 362 SI Installation and Upgrades June 2004 ...
Страница 498: ...Test the System LED Indicators 498 SI Installation and Upgrades June 2004 ...
Страница 650: ...Add IP Solutions Task list Upgrade a TN802 to a TN802B 650 SI Installation and Upgrades June 2004 ...
Страница 692: ...Install and Administer Trunks Add TN1654 DS1 Converter r only 692 SI Installation and Upgrades June 2004 ...
Страница 770: ...Connecting and Handling Fiber Optic Cables Cleaning Fiber Optic Cables 770 SI Installation and Upgrades June 2004 ...
Страница 784: ...Connector and Cable Diagrams Pinout Charts DS1 Interface Cable H600 307 784 SI Installation and Upgrades June 2004 ...
Страница 792: ...UPS Installation for SCC1 EPN A Carrier Cabinet Task List Install UPS 792 SI Installation and Upgrades June 2004 ...
Страница 874: ...Index Z 874 SI Installation and Upgrades June 2004 ...


