


Chapter 3: Initial Installation and Configuration
33
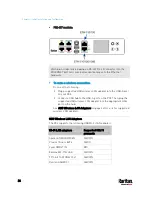
PX3-iX7 models:
To use the command line interface (CLI) for configuration, establish an
RS-232 or USB connection.
To use a web browser for configuration, make a network connection to
the computer. The PX3 is automatically configured with the following
link-local addressing in any network without DHCP available:
https://169.254.x.x (where x is a number)
https://pdu.local
See
APIPA and Link-Local Addressing
(on page 3).
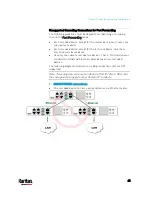
Establish one of the following connections to a computer. The Ethernet
port of PX3 must be enabled for the described connection to work
properly. Per default, the Ethernet port is enabled.
Direct network connection:
1.
Connect one end of a standard network patch cable to the
ETHERNET port of the PX3.
For iX7
™
with dual Ethernet ports, either Ethernet port is fine.
2.
Connect the other end to a computer's Ethernet port.
3.
On the connected computer, launch a web browser to access the PX3,
using either link-local addressing:
pdu.local or 169.254.x.x. See
Login
(on page 132).
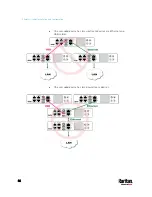
USB connection:
1.
A USB-to-serial driver is required in Windows
®
. Install this driver
before connecting the USB cable. See
Installing the USB-to-Serial
Driver (Optional)
(on page 811).
2.
Connect a USB cable between the PX3 device's USB-B port and a
computer's USB-A port.
3.
Perform
Initial Network Configuration via CLI
(on page 812).
Содержание PX3-3000 series
Страница 5: ......
Страница 18: ...Contents xviii Index 841...
Страница 66: ...Chapter 3 Initial Installation and Configuration 42 Number Device role Master device Slave 1 Slave 2 Slave 3...
Страница 93: ...Chapter 4 Connecting External Equipment Optional 69...
Страница 787: ...Appendix J RADIUS Configuration Illustration 763 Note If your PX3 uses PAP then select PAP...
Страница 788: ...Appendix J RADIUS Configuration Illustration 764 10 Select Standard to the left of the dialog and then click Add...
Страница 789: ...Appendix J RADIUS Configuration Illustration 765 11 Select Filter Id from the list of attributes and click Add...
Страница 792: ...Appendix J RADIUS Configuration Illustration 768 14 The new attribute is added Click OK...
Страница 793: ...Appendix J RADIUS Configuration Illustration 769 15 Click Next to continue...
Страница 823: ...Appendix K Additional PX3 Information 799...
Страница 853: ...Appendix L Integration 829 3 Click OK...


