


Chapter 6: Using the Web Interface
263
In this example, NIC-2 (fd07:2fa:6cff:2405::80) is the next hop router for
your PX3 to communicate with any device in the other subnet
fd07:2fa:6cff:1111::0.
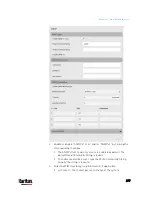
In the IPv6 "Static Routes" section, you should enter the data as shown
below. Note that the address in the first field must be of the Classless
Inter-Domain Routing (CIDR) notation.
Tip: If you have configured multiple static routes, you can click on any
route and then make changes, use
or
to re-sort the
priority, or click
to delete it.
Interface Names
When your local multiple networks are "directly reachable", you should
select Interface for static routes. Then choose the interface where
another network is connected.
Содержание PX3-3000 series
Страница 5: ......
Страница 18: ...Contents xviii Index 841...
Страница 66: ...Chapter 3 Initial Installation and Configuration 42 Number Device role Master device Slave 1 Slave 2 Slave 3...
Страница 93: ...Chapter 4 Connecting External Equipment Optional 69...
Страница 787: ...Appendix J RADIUS Configuration Illustration 763 Note If your PX3 uses PAP then select PAP...
Страница 788: ...Appendix J RADIUS Configuration Illustration 764 10 Select Standard to the left of the dialog and then click Add...
Страница 789: ...Appendix J RADIUS Configuration Illustration 765 11 Select Filter Id from the list of attributes and click Add...
Страница 792: ...Appendix J RADIUS Configuration Illustration 768 14 The new attribute is added Click OK...
Страница 793: ...Appendix J RADIUS Configuration Illustration 769 15 Click Next to continue...
Страница 823: ...Appendix K Additional PX3 Information 799...
Страница 853: ...Appendix L Integration 829 3 Click OK...


