


Chapter 6: Using the Web Interface
337
External Beeper
If an external beeper is connected to the PX3, the PX3 can change the
beeper's behavior or status to respond to a certain event.
To control the connected external beeper:
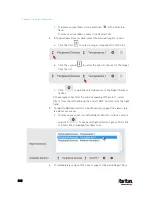
1.
Choose Device Settings > Event Rules >
.
2.
Select "External beeper" from the Action list.
3.
In the Beeper Port field, select the port where the external beeper is
connected. This port is the FEATURE port.
4.
In the Beeper Action field, select an action for the external beeper to
carry out.
Alarm: Causes the external beeper to sound an alarm cycle every
20 seconds - stays on for 0.7 seconds and then off for 19.3
seconds.
On: Turns on the external beeper so that it buzzes continuously.
Off: Turns off the external beeper so that it stops buzzing.
Warning: If you create an event rule for the external beeper but
disconnect it when an event causes it to beep, the beeper no longer
beeps after it is re-connected even though the event triggering the
beeping action remains asserted.
Internal Beeper
You can have the built-in beeper of the PX3 turned on or off when a
certain event occurs.
Operation:
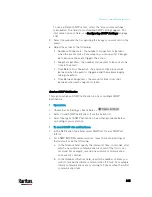
1.
Choose Device Settings > Event Rules >
.
2.
Select "Internal beeper" from the Action list.
3.
Select an option from the Operation field.
Turn Beeper On: Turns on the internal beeper to make it buzz.
Turn Beeper Off: Turns off the internal beeper to make it stop
buzzing.
Log an Event Message
The option "Log event message" records the selected events in the
internal log.
The default log message generated for each type of event is available in
the section titled
Default Log Messages
(on page 319).
Содержание PX3-3000 series
Страница 5: ......
Страница 18: ...Contents xviii Index 841...
Страница 66: ...Chapter 3 Initial Installation and Configuration 42 Number Device role Master device Slave 1 Slave 2 Slave 3...
Страница 93: ...Chapter 4 Connecting External Equipment Optional 69...
Страница 787: ...Appendix J RADIUS Configuration Illustration 763 Note If your PX3 uses PAP then select PAP...
Страница 788: ...Appendix J RADIUS Configuration Illustration 764 10 Select Standard to the left of the dialog and then click Add...
Страница 789: ...Appendix J RADIUS Configuration Illustration 765 11 Select Filter Id from the list of attributes and click Add...
Страница 792: ...Appendix J RADIUS Configuration Illustration 768 14 The new attribute is added Click OK...
Страница 793: ...Appendix J RADIUS Configuration Illustration 769 15 Click Next to continue...
Страница 823: ...Appendix K Additional PX3 Information 799...
Страница 853: ...Appendix L Integration 829 3 Click OK...


