


Appendix K: Additional PX3 Information
800
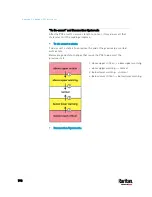
In the threshold settings, the Deassertion Hysteresis field determines a
new level to trigger the "deassertion" action.
This function is similar to a thermostat, which instructs the air
conditioner to turn on the cooling system when the temperature exceeds
a pre-determined level. "Deassertion Hysteresis" instructs the PX3 to
de-assert the worse state for a sensor only when that sensor's reading
reaches the pre-determined "deassertion" level.
For upper thresholds, this "deassertion" level is a decrease against each
threshold. For lower thresholds, this level is an increase to each
threshold. The absolute value of the decrease/increase is exactly the
hysteresis value.
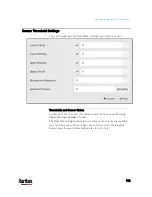
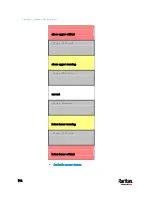
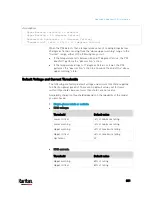
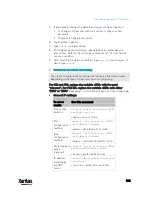
For example, if Deassertion Hysteresis = 2, then the deassertion level of
each threshold is either "+2" or "-2" as illustrated below.
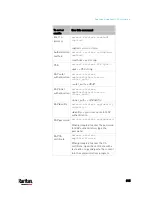
Threshold value
Deassertion value
Upper Critical = 33
Deassertion level = 31
33 - 2 = 31
Upper Warning = 25
Deassertion level = 23
25 - 2 = 23
Lower Critical = 10
Deassertion level = 12
10 + 2 = 12
Lower Warning = 18
Deassertion level = 20
18 + 2 = 20
To use each threshold as the "deassertion" level instead of determining
a new level, set the Deassertion Hysteresis to 0 (zero).
How "Deassertion Hysteresis" is helpful:
If you have created an event rule that instructs the PX3 to send
notifications for deassertion events, setting the "Deassertion Hysteresis"
is helpful for eliminating a number of notifications that you may receive
in case a sensor's readings fluctuate around a certain threshold.
Deassertion Hysteresis Example for Temperature Sensors
Содержание PX3-3000 series
Страница 5: ......
Страница 18: ...Contents xviii Index 841...
Страница 66: ...Chapter 3 Initial Installation and Configuration 42 Number Device role Master device Slave 1 Slave 2 Slave 3...
Страница 93: ...Chapter 4 Connecting External Equipment Optional 69...
Страница 787: ...Appendix J RADIUS Configuration Illustration 763 Note If your PX3 uses PAP then select PAP...
Страница 788: ...Appendix J RADIUS Configuration Illustration 764 10 Select Standard to the left of the dialog and then click Add...
Страница 789: ...Appendix J RADIUS Configuration Illustration 765 11 Select Filter Id from the list of attributes and click Add...
Страница 792: ...Appendix J RADIUS Configuration Illustration 768 14 The new attribute is added Click OK...
Страница 793: ...Appendix J RADIUS Configuration Illustration 769 15 Click Next to continue...
Страница 823: ...Appendix K Additional PX3 Information 799...
Страница 853: ...Appendix L Integration 829 3 Click OK...


