Chapter 3: Initial Installation and Configuration
24
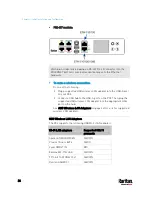
PX3-iX7 models:
Warning: Accidentally plugging an RS-232 RJ-45 connector into the
ETHERNET port can cause permanent damages to the Ethernet
hardware.
To make a wireless connection:
Do one of the following:
Plug a supported USB wireless LAN adapter into the USB-A port
on your PX3.
Connect a USB hub to the USB-A port on the PX3. Then plug the
supported USB wireless LAN adapter into the appropriate USB
port on the hub.
See
USB Wireless LAN Adapters
(on page 24) for a list of supported
wireless LAN adapters.
USB Wireless LAN Adapters
The PX3 supports the following USB Wi-Fi LAN adapters.
Wi-Fi LAN adapters
Supported 802.11
protocols
SparkLAN WUBR-508N
A/B/G/N
Proxim Orinoco 8494
A/B/G
Zyxel NWD271N
B/G
Edimax EW-7722UnD
A/B/G/N
TP-Link TL-WDN3200 v1
A/B/G/N
Raritan USB WIFI
A/B/G/N
Содержание PX3-3000 series
Страница 5: ......
Страница 18: ...Contents xviii Index 841...
Страница 66: ...Chapter 3 Initial Installation and Configuration 42 Number Device role Master device Slave 1 Slave 2 Slave 3...
Страница 93: ...Chapter 4 Connecting External Equipment Optional 69...
Страница 787: ...Appendix J RADIUS Configuration Illustration 763 Note If your PX3 uses PAP then select PAP...
Страница 788: ...Appendix J RADIUS Configuration Illustration 764 10 Select Standard to the left of the dialog and then click Add...
Страница 789: ...Appendix J RADIUS Configuration Illustration 765 11 Select Filter Id from the list of attributes and click Add...
Страница 792: ...Appendix J RADIUS Configuration Illustration 768 14 The new attribute is added Click OK...
Страница 793: ...Appendix J RADIUS Configuration Illustration 769 15 Click Next to continue...
Страница 823: ...Appendix K Additional PX3 Information 799...
Страница 853: ...Appendix L Integration 829 3 Click OK...


