


Chapter 6: Using the Web Interface
403
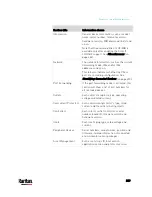
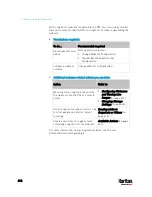
Mechanical designs ignored by bulk configuration:
When the source and target devices share the same technical
specifications but are only different with any "mechanical designs" which
are indicated in the table below, the bulk configuration remains feasible.
These mechanical designs are represented by suffixes added to the
model name of a PX3 device. In the table,
x represents a number. For
example, A
x can be A1, A2, A3, and so on.
Suffix
Mechanical design
Example
A
x
The line cord's length in meters
Note: For a PX2 or PX3 inline monitor,
it is likely two Ax's are added to the
model name for indicating the lengths
of its inlets' and outlets' line cords.
A20 = 3.3 meters
B
x
The line cord's color
B501 = bright red
orange
C
x
Cord types or options
C4 = power cord
with the standard
gauge
D
x
Plug types or options
D1 = IP67
watertight plug
E
x
Outlet types or options
E2 =
Locking C13
or
Locking C19
G
x
Controller options
G0 = no
controller
K
x
Chassis colors
K6 = yellow
L
x
The line cord's length in centimeters
N
x
Chassis dimensions or other
mechanical changes
O
x OCP
brand
options
P
x
Special requests for device painting or
printing
Q
x
Special requests for physical
placement arrangements
U
x
Different power plug brands
Содержание PX3-3000 series
Страница 5: ......
Страница 18: ...Contents xviii Index 841...
Страница 66: ...Chapter 3 Initial Installation and Configuration 42 Number Device role Master device Slave 1 Slave 2 Slave 3...
Страница 93: ...Chapter 4 Connecting External Equipment Optional 69...
Страница 787: ...Appendix J RADIUS Configuration Illustration 763 Note If your PX3 uses PAP then select PAP...
Страница 788: ...Appendix J RADIUS Configuration Illustration 764 10 Select Standard to the left of the dialog and then click Add...
Страница 789: ...Appendix J RADIUS Configuration Illustration 765 11 Select Filter Id from the list of attributes and click Add...
Страница 792: ...Appendix J RADIUS Configuration Illustration 768 14 The new attribute is added Click OK...
Страница 793: ...Appendix J RADIUS Configuration Illustration 769 15 Click Next to continue...
Страница 823: ...Appendix K Additional PX3 Information 799...
Страница 853: ...Appendix L Integration 829 3 Click OK...


