


Chapter 2: Rackmount, Inlet and Outlet Connections
9
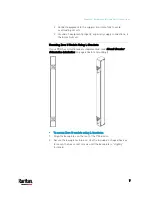
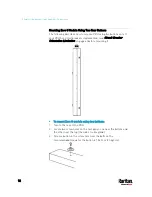
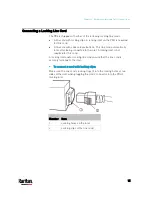
Mounting Zero U Models Using Button Mount
If your PDU has circuit breakers implemented, read
Circuit Breaker
Orientation Limitation
(on page 6) before mounting it.
To mount Zero-U models using button mount:
1.
Align the baseplates on the rear of the PX3 device. Leave at least 24
inches between the baseplates for stability.
2.
Make the baseplates grasp the device lightly. Use the included
L-shaped hex key to loosen the hex socket screws until the
baseplate is "slightly" fastened.
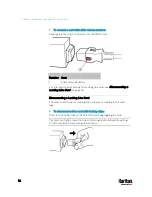
3.
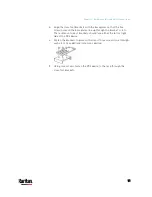
Screw each mounting button in the center of each baseplate. The
recommended torque for the button is 1.96 N·m (20 kgf·cm).
4.
Align the large mounting buttons with the mounting holes in the
cabinet, fixing one in place and adjusting the other.
Содержание PX3-3000 series
Страница 5: ......
Страница 18: ...Contents xviii Index 841...
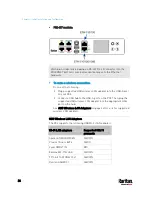
Страница 66: ...Chapter 3 Initial Installation and Configuration 42 Number Device role Master device Slave 1 Slave 2 Slave 3...
Страница 93: ...Chapter 4 Connecting External Equipment Optional 69...
Страница 787: ...Appendix J RADIUS Configuration Illustration 763 Note If your PX3 uses PAP then select PAP...
Страница 788: ...Appendix J RADIUS Configuration Illustration 764 10 Select Standard to the left of the dialog and then click Add...
Страница 789: ...Appendix J RADIUS Configuration Illustration 765 11 Select Filter Id from the list of attributes and click Add...
Страница 792: ...Appendix J RADIUS Configuration Illustration 768 14 The new attribute is added Click OK...
Страница 793: ...Appendix J RADIUS Configuration Illustration 769 15 Click Next to continue...
Страница 823: ...Appendix K Additional PX3 Information 799...
Страница 853: ...Appendix L Integration 829 3 Click OK...


