


Chapter 3: Initial Installation and Configuration
36
pre-3.3.10 firmware version to version 3.3.10 or later, follow the
Upgrade Sequence in an Existing Cascading Chain (on page 398).
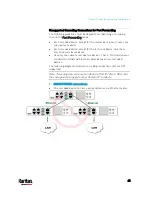
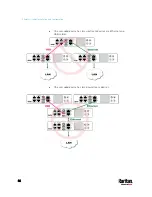
You can have multiple PX3 devices share one Ethernet connection by
cascading them via one of the interfaces below:
USB interface -- for cascading multiple PX3 or multiple iX7
™
PDUs
Ethernet interface -- for cascading multiple iX7
™
PDUs
The first one in the cascading chain is the master device and all the other
are slave devices. Only the master device is physically connected to the
LAN -- wired or wireless.
Each device in the chain is accessible over the network, with the Bridging
or Port-Forwarding cascading mode activated on the master device. See
Setting the Cascading Mode
(on page 265).
Bridging: Each device in the cascading chain is accessed with a
different IP address.
Port Forwarding: Each device in the cascading chain is accessed
with the same IP address(es) but with a different port number
assigned.
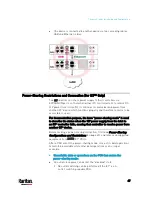
Basic cascading restrictions:
All devices in the chain must run "compatible" firmware versions.
Firmware version 3.3.10 or later is NOT compatible with
pre-3.3.10 firmware versions in terms of the cascading feature
so all devices in the cascading chain must run version 3.3.10 or
later.
In the Bridging mode, the master device can have "only one"
connection to the network. If the master device is an iX7
™
device with
two Ethernet ports, DO NOT connect both ports to the network(s)
unless your network has the R/STP protocol enabled.
Note: The Port Forwarding mode does NOT have this restriction. In
this mode, you can enable one wired and one wireless network
connections for non-iX7 products, or enable two wired and one
wireless network connections for iX7
™
products.
Содержание PX3-3000 series
Страница 5: ......
Страница 18: ...Contents xviii Index 841...
Страница 66: ...Chapter 3 Initial Installation and Configuration 42 Number Device role Master device Slave 1 Slave 2 Slave 3...
Страница 93: ...Chapter 4 Connecting External Equipment Optional 69...
Страница 787: ...Appendix J RADIUS Configuration Illustration 763 Note If your PX3 uses PAP then select PAP...
Страница 788: ...Appendix J RADIUS Configuration Illustration 764 10 Select Standard to the left of the dialog and then click Add...
Страница 789: ...Appendix J RADIUS Configuration Illustration 765 11 Select Filter Id from the list of attributes and click Add...
Страница 792: ...Appendix J RADIUS Configuration Illustration 768 14 The new attribute is added Click OK...
Страница 793: ...Appendix J RADIUS Configuration Illustration 769 15 Click Next to continue...
Страница 823: ...Appendix K Additional PX3 Information 799...
Страница 853: ...Appendix L Integration 829 3 Click OK...


