


Chapter 10: In-Line Monitors
648
8.
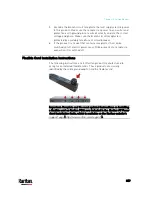
Re-install the PDU wiring access panel or in-line monitor cover plate.
This completes internal wiring of the Raritan product.
9.
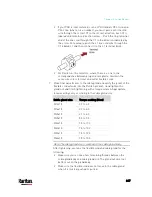
For in-line monitors, fasten the receptacles to the outlet flexible
cords following the manufacturer’s instructions.
10.
Complete the wiring of the inlet flexible cord by performing one of
these steps:
Assemble the plug following the manufacturer’s instructions.
Permanently attach and strain relief the flexible cord to a
junction box following applicable electrical codes.
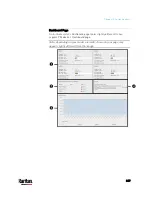
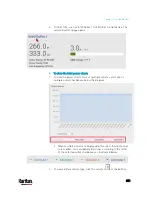
In-Line Monitor's Web Interface
An in-line monitor's web interface is similar to a regular PX3 model's
web interface.
See
Using the Web Interface
(on page 131) for login instructions and
additional information.
Содержание PX3-3000 series
Страница 5: ......
Страница 18: ...Contents xviii Index 841...
Страница 66: ...Chapter 3 Initial Installation and Configuration 42 Number Device role Master device Slave 1 Slave 2 Slave 3...
Страница 93: ...Chapter 4 Connecting External Equipment Optional 69...
Страница 787: ...Appendix J RADIUS Configuration Illustration 763 Note If your PX3 uses PAP then select PAP...
Страница 788: ...Appendix J RADIUS Configuration Illustration 764 10 Select Standard to the left of the dialog and then click Add...
Страница 789: ...Appendix J RADIUS Configuration Illustration 765 11 Select Filter Id from the list of attributes and click Add...
Страница 792: ...Appendix J RADIUS Configuration Illustration 768 14 The new attribute is added Click OK...
Страница 793: ...Appendix J RADIUS Configuration Illustration 769 15 Click Next to continue...
Страница 823: ...Appendix K Additional PX3 Information 799...
Страница 853: ...Appendix L Integration 829 3 Click OK...


