Chapter 4: Connecting External Equipment (Optional)
73
Note: The asset strip is implemented with a tilt sensor so it can be
mounted upside down.
Introduction to Asset Tags
You need both asset strips and asset tags for tracking IT devices.
Asset tags provide an ID number for each IT device. The asset tags are
adhered to an IT device at one end and plugged in to an asset strip at the
other.
The asset strip is connected to the PX3, and the asset tag transmits the
ID and positioning information to the asset strip.
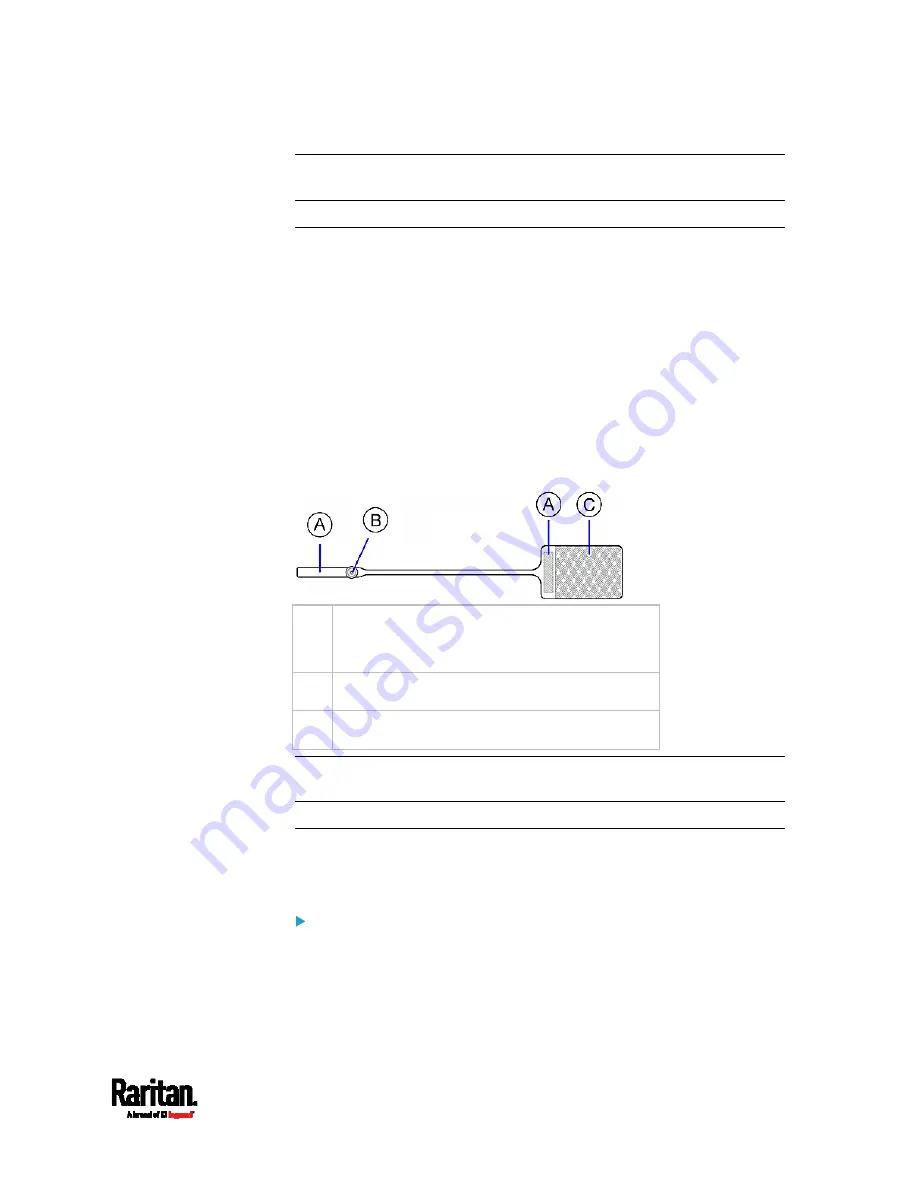
The following diagram illustrates an asset tag. Note that there are two
types of asset tags: non-programmable and programmable tags. The
only difference is that programmable asset tags allow you to customize
each tag's ID or barcode number while non-programmable ones have
factory default ID or barcode numbers, which you cannot change.
A
Barcode (ID number), which is available on
either end of the "non-programmable" asset
tag
B
Tag connector
C
Adhesive area with the tape
Note: The barcode of each "non-programmable" asset tag is unique and
is displayed in the PX3 device's web interface for identification.
Connecting Regular Asset Strips to PX3
The cabling distance between an asset strip assembly and the PX3 can
be up to 10 meters.
To connect regular asset strips to the PX3 device:
1.
Affix the adhesive end of an asset tag to each IT device through the
tag's tape.
2.
Plug the connector of each asset tag into the corresponding tag port
on the asset strip.
Содержание PX3-3000 series
Страница 5: ......
Страница 18: ...Contents xviii Index 841...
Страница 66: ...Chapter 3 Initial Installation and Configuration 42 Number Device role Master device Slave 1 Slave 2 Slave 3...
Страница 93: ...Chapter 4 Connecting External Equipment Optional 69...
Страница 787: ...Appendix J RADIUS Configuration Illustration 763 Note If your PX3 uses PAP then select PAP...
Страница 788: ...Appendix J RADIUS Configuration Illustration 764 10 Select Standard to the left of the dialog and then click Add...
Страница 789: ...Appendix J RADIUS Configuration Illustration 765 11 Select Filter Id from the list of attributes and click Add...
Страница 792: ...Appendix J RADIUS Configuration Illustration 768 14 The new attribute is added Click OK...
Страница 793: ...Appendix J RADIUS Configuration Illustration 769 15 Click Next to continue...
Страница 823: ...Appendix K Additional PX3 Information 799...
Страница 853: ...Appendix L Integration 829 3 Click OK...


