


Chapter 6: Using the Web Interface
424
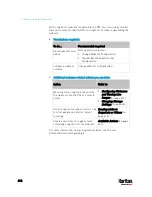
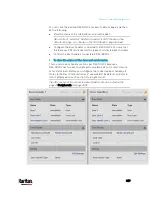
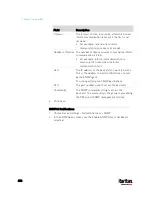
Storage location
Description
Local
'Local' means the PX3. This is the default.
It can store a maximum of 10 snapshots only.
The web interface can list and display all
snapshots stored on the PX3. See
Viewing and
Managing Locally-Saved Snapshots
(on page
All snapshots are CLEARED when the PX3 is
rebooted.
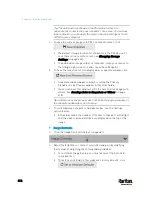
CIFS/Samba
Snapshots are saved onto a Common Internet File
System/Samba.
The total number of saved snapshots depends
on the server's capacity.
All saved snapshots remain available after
rebooting the PX3.
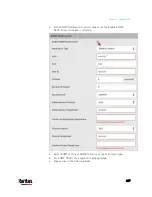
Configure the following fields:
*
Server - the desired CIFS/Samba server
*
Share/Folder - this is the share drive/folder
*
Username - for server access
*
Password - for server access
FTP
Snapshots are saved onto a FTP server.
The total number of saved snapshots depends
on the server's capacity.
All saved snapshots remain available after
rebooting the PX3.
Configure the following fields:
*
Server URL - the FTP server's path
*
Username - for server access
*
Password - for server access
To find where the snapshots are saved on CIFS/Samba or FTP, see
Identifying Snapshots Folders on Remote Servers
(on page 425).
3.
Click Save.
Warning: Before disconnecting or powering off any remote server
where the webcam snapshots are being stored, you must first
change the storage settings, or the connectivity issue of the remote
server may degrade the performance of the PX3 web interface. If this
issue occurs, first restore the connectivity of the remote server and
then change the storage settings of the webcam snapshots.
Содержание PX3-3000 series
Страница 5: ......
Страница 18: ...Contents xviii Index 841...
Страница 66: ...Chapter 3 Initial Installation and Configuration 42 Number Device role Master device Slave 1 Slave 2 Slave 3...
Страница 93: ...Chapter 4 Connecting External Equipment Optional 69...
Страница 787: ...Appendix J RADIUS Configuration Illustration 763 Note If your PX3 uses PAP then select PAP...
Страница 788: ...Appendix J RADIUS Configuration Illustration 764 10 Select Standard to the left of the dialog and then click Add...
Страница 789: ...Appendix J RADIUS Configuration Illustration 765 11 Select Filter Id from the list of attributes and click Add...
Страница 792: ...Appendix J RADIUS Configuration Illustration 768 14 The new attribute is added Click OK...
Страница 793: ...Appendix J RADIUS Configuration Illustration 769 15 Click Next to continue...
Страница 823: ...Appendix K Additional PX3 Information 799...
Страница 853: ...Appendix L Integration 829 3 Click OK...


