


Chapter 10: In-Line Monitors
647
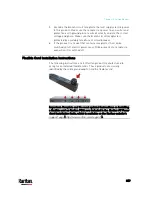
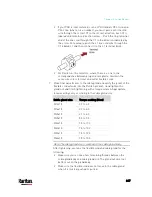
If your PDU is inlet metered, such as PDU models PX2-1nnn and
PX2-2nnn (where n is a number), you must pass each line cord
wire through the correct CT in the correct direction. Each CT is
labeled and contains a direction arrow. Push the ring terminal
end of the line cord through the CT in the direction indicated by
the arrow. For example, push the L1 line cord wire through the
CT labeled L1 and then connect it to the L1 terminal block.
For Raritan in-line monitors, where there is a one to one
correspondence between plug and receptacle, maintain the
same wire colors for inlet and outlet flexible cords.
7.
Make final adjustments to the cable gland and verify the jacket of the
flexible cord extends into the Raritan product. Hand tighten the
gland nut and finish tightening with a torque wrench. Appropriate
torque settings vary according to the cable gland size.
Cable gland size
Torque setting (N·m)
M12x1.5
0.7 to 0.9
M16x1.5
2.0 to 3.0
M20x1.5
2.7 to 4.0
M25x1.5
5.0 to 7.5
M32x1.5
7.5 to 10.0
M40x1.5
7.5 to 10.0
M50x1.5
7.5 to 10.0
M63x1.5
7.5 to 10.0
Note: The cable gland size is marked on the cable gland body.
After tightening, examine the flexible cord and cable gland for the
following:
Make sure you can see a few remaining threads between the
cable gland body and cable gland nut. The gland nut must not
bottom out on the gland body.
Make sure the flexible cord does not move in the cable gland
when it is twisted, pushed or pulled.
Содержание PX3-3000 series
Страница 5: ......
Страница 18: ...Contents xviii Index 841...
Страница 66: ...Chapter 3 Initial Installation and Configuration 42 Number Device role Master device Slave 1 Slave 2 Slave 3...
Страница 93: ...Chapter 4 Connecting External Equipment Optional 69...
Страница 787: ...Appendix J RADIUS Configuration Illustration 763 Note If your PX3 uses PAP then select PAP...
Страница 788: ...Appendix J RADIUS Configuration Illustration 764 10 Select Standard to the left of the dialog and then click Add...
Страница 789: ...Appendix J RADIUS Configuration Illustration 765 11 Select Filter Id from the list of attributes and click Add...
Страница 792: ...Appendix J RADIUS Configuration Illustration 768 14 The new attribute is added Click OK...
Страница 793: ...Appendix J RADIUS Configuration Illustration 769 15 Click Next to continue...
Страница 823: ...Appendix K Additional PX3 Information 799...
Страница 853: ...Appendix L Integration 829 3 Click OK...


