


Appendix L: Integration
830
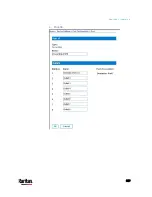
Associating Outlets with Target Devices
The Port page opens when you click on a port on the Port Configuration
page.
If an outlet is connected to the same server that the port is connected to,
a power association can be made with the target device.
A server can have up to four power plugs and you can associate a
different rack PDU (power strip) with each. From this page, you can
define those associations so that you can power on, power off, and power
cycle the server from the Port Access page.
To use this feature, you will need:
Raritan remote rack PDU(s)
Power CIMs (D2CIM-PWR)
Make a Power Association
To make power associations (associate rack PDU outlets to KVM
target servers):
Note: When a rack PDU is associated to a target server (port), the outlet
name is replaced by the target server name (even if you assigned
another name to the outlet).
1.
On the Port Configuration page, select the target server you are
associating the PDU with.
2.
Choose the rack PDU from the Power Strip Name drop-down list.
3.
For that rack PDU, choose the outlet from the Outlet Name
drop-down list.
4.
Repeat steps 1 and 2 for all desired power associations.
5.
Click OK. A confirmation message is displayed.
Turning Outlets On/Off and Cycling Power
To turn an outlet on:
1.
Click the Power menu to access the Powerstrip page.
2.
From the Powerstrip drop-down, select the PX rack PDU (power
strip) you want to turn on.
3.
Click Refresh to view the power controls.
4.
Click On next to the outlet you want to power on.
5.
Click OK to close the Power On confirmation dialog. The outlet will
be turned on and its state will be displayed as 'on'.
Содержание PX3-3000 series
Страница 5: ......
Страница 18: ...Contents xviii Index 841...
Страница 66: ...Chapter 3 Initial Installation and Configuration 42 Number Device role Master device Slave 1 Slave 2 Slave 3...
Страница 93: ...Chapter 4 Connecting External Equipment Optional 69...
Страница 787: ...Appendix J RADIUS Configuration Illustration 763 Note If your PX3 uses PAP then select PAP...
Страница 788: ...Appendix J RADIUS Configuration Illustration 764 10 Select Standard to the left of the dialog and then click Add...
Страница 789: ...Appendix J RADIUS Configuration Illustration 765 11 Select Filter Id from the list of attributes and click Add...
Страница 792: ...Appendix J RADIUS Configuration Illustration 768 14 The new attribute is added Click OK...
Страница 793: ...Appendix J RADIUS Configuration Illustration 769 15 Click Next to continue...
Страница 823: ...Appendix K Additional PX3 Information 799...
Страница 853: ...Appendix L Integration 829 3 Click OK...


