


Chapter 10: In-Line Monitors
642
Wiring of 3-Phase In-Line Monitors
3-phase in-line monitors contain 4-pole wiring terminal blocks (L1, L2,
L3, N) to monitor 5-wire (4P+PE) 3-phase wye connections. Delta wired
4-wire (3P+PE) 3-phase connections are also permitted (no wire
connected to the terminal block neutral “N”). No additional hardware or
firmware configuration is required to specify whether the connection is
5-wire wye or 4-wire delta.
In-Line Monitor Unused Channels
It is not necessary to wire up all channels of multi-channel in-line
monitors. The inlet and outlet openings of unused channels must be
completely closed off. “Goof plugs” for this purpose may be a good
choice if they are available in your country or region.
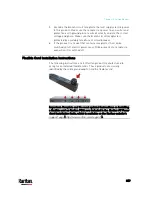
Step by Step Flexible Cord Installation
The following items are required to complete the installation:
Flexible cord(s).
Insulated ring terminals (one for each wire) and appropriate crimp
tool.
Plug(s) and receptacle(s) (for in-line monitors)
Torque screwdriver, torque nut driver and torque wrench to tighten
the wiring terminal block screws, ground nut and cable gland nut.
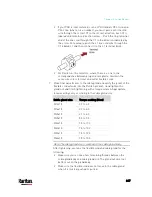
To install a flexible cord:
1.
Open the PDU's access panel (or in-line monitor top panel) to expose
the power wiring terminal block(s).
Содержание PX3-3000 series
Страница 5: ......
Страница 18: ...Contents xviii Index 841...
Страница 66: ...Chapter 3 Initial Installation and Configuration 42 Number Device role Master device Slave 1 Slave 2 Slave 3...
Страница 93: ...Chapter 4 Connecting External Equipment Optional 69...
Страница 787: ...Appendix J RADIUS Configuration Illustration 763 Note If your PX3 uses PAP then select PAP...
Страница 788: ...Appendix J RADIUS Configuration Illustration 764 10 Select Standard to the left of the dialog and then click Add...
Страница 789: ...Appendix J RADIUS Configuration Illustration 765 11 Select Filter Id from the list of attributes and click Add...
Страница 792: ...Appendix J RADIUS Configuration Illustration 768 14 The new attribute is added Click OK...
Страница 793: ...Appendix J RADIUS Configuration Illustration 769 15 Click Next to continue...
Страница 823: ...Appendix K Additional PX3 Information 799...
Страница 853: ...Appendix L Integration 829 3 Click OK...


