


Chapter 6: Using the Web Interface
306
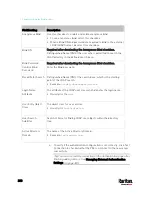
To force users to create strong passwords:
1.
Select the 'Enabled' checkbox of Strong Passwords to activate the
strong password feature. The following are the default settings:
Minimum length
= 8 characters
Maximum length
= 32 characters
At least one lowercase character
= Required
At least one uppercase character
= Required
At least one numeric character
= Required
At least one special character
= Required
Number of forbidden previous passwords
= 5
Note: The maximum password length accepted by the PX3 is 64
characters.
2.
Make changes to the default settings as needed.
3.
Click Save.
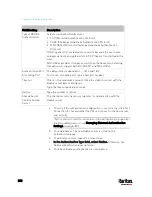
Enabling the Restricted Service Agreement
The restricted service agreement feature, if enabled, forces users to
read a security agreement when they log in to the PX3.
Users must accept the agreement, or they cannot log in.
An event notifying you if a user has accepted or declined the agreement
can be generated. See
Default Log Messages
(on page 319)
To enable the service agreement:
1.
Click Device Settings > Security > Service Agreement.
2.
Select the Enforce Restricted Service Agreement checkbox.
3.
Edit or paste the content as needed.
A maximum of 10,000 characters can be entered.
4.
Click Save.
Содержание PX3-3000 series
Страница 5: ......
Страница 18: ...Contents xviii Index 841...
Страница 66: ...Chapter 3 Initial Installation and Configuration 42 Number Device role Master device Slave 1 Slave 2 Slave 3...
Страница 93: ...Chapter 4 Connecting External Equipment Optional 69...
Страница 787: ...Appendix J RADIUS Configuration Illustration 763 Note If your PX3 uses PAP then select PAP...
Страница 788: ...Appendix J RADIUS Configuration Illustration 764 10 Select Standard to the left of the dialog and then click Add...
Страница 789: ...Appendix J RADIUS Configuration Illustration 765 11 Select Filter Id from the list of attributes and click Add...
Страница 792: ...Appendix J RADIUS Configuration Illustration 768 14 The new attribute is added Click OK...
Страница 793: ...Appendix J RADIUS Configuration Illustration 769 15 Click Next to continue...
Страница 823: ...Appendix K Additional PX3 Information 799...
Страница 853: ...Appendix L Integration 829 3 Click OK...


