


Appendix G: Old PX3 Character LCD Display
732
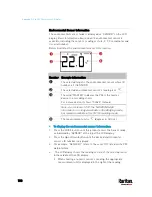
Note that if the DPX3-ENVHUB4 sensor hub is used to connect
the DPX2, DPX3 or DX sensors, the chain position information
(C:x) is displayed twice - the first one indicates the sensor hub's
chain position, which is always
C:1, and the second one indicates
the sensor's chain position.
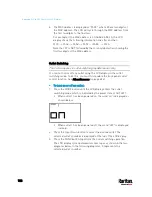
6.
Press the FUNC button to display the X, Y and Z coordinates of the
sensor respectively.
X coordinate is shown as "x:NN," where NN are the first two
numeric digits entered for the X coordinate in the web interface.
Y coordinate is shown as "y:NN," where NN are the first two
numeric digits entered for the Y coordinate in the web interface.
Z coordinate is shown as "z:NN," where NN are the first two
numeric digits entered for the Z coordinate in the web interface.
If one or both of the first two digits for a specific coordinate are
alphabetical characters, these alphabetical characters are replaced
with dashes (-).
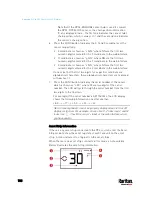
7.
Press the FUNC button to display the serial number of the sensor,
which is shown as "s:XX," where XX are two digits of the serial
number. The LCD will cycle through the serial number from the first
two digits to the final two.
For example, if the serial number is AE17A00022, the LCD display
shows the following information one after another:
s:AE --> s:17 --> s:A0 --> s:00 --> s:22
Note: Some alphabets cannot be properly displayed due to the LCD
display restriction. For example, Q looks like 9, Z looks like 2, and M
looks like
. Check the sensor's label or the web interface when
you have doubts.
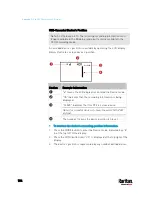
Asset Strip Information
If there is any asset strip connected to the PX3, you can enter the Asset
Strip mode to show the asset tag state of each rack unit on the asset
strip. A rack unit refers to a tag port on the asset strips.
When there are no asset strips connected, this mode is not available.
Below illustrates the asset strip information.
Содержание PX3-3000 series
Страница 5: ......
Страница 18: ...Contents xviii Index 841...
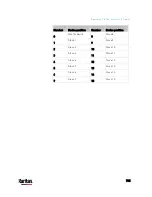
Страница 66: ...Chapter 3 Initial Installation and Configuration 42 Number Device role Master device Slave 1 Slave 2 Slave 3...
Страница 93: ...Chapter 4 Connecting External Equipment Optional 69...
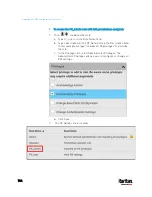
Страница 787: ...Appendix J RADIUS Configuration Illustration 763 Note If your PX3 uses PAP then select PAP...
Страница 788: ...Appendix J RADIUS Configuration Illustration 764 10 Select Standard to the left of the dialog and then click Add...
Страница 789: ...Appendix J RADIUS Configuration Illustration 765 11 Select Filter Id from the list of attributes and click Add...
Страница 792: ...Appendix J RADIUS Configuration Illustration 768 14 The new attribute is added Click OK...
Страница 793: ...Appendix J RADIUS Configuration Illustration 769 15 Click Next to continue...
Страница 823: ...Appendix K Additional PX3 Information 799...
Страница 853: ...Appendix L Integration 829 3 Click OK...


