


Chapter 6: Using the Web Interface
350
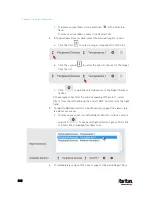
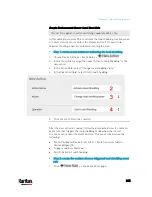
4.
In the Transport Protocol field, select one of the syslog protocols:
TCP, UDP or TCP+TLS. The default is UDP.
Transport
protocols
Next steps
UDP
In the UDP Port field, type an appropriate port number. Default is 514.
Select the "Legacy BSD Syslog Protocol" checkbox if applicable.
TCP
NO TLS certificate is required. Type an appropriate port number in the TCP Port field.
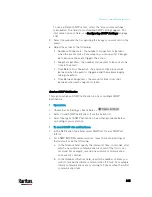
TCP+TLS
A TLS certificate is required. Do the following:
a.
Type an appropriate port number in the "TCP Port" field. Default is 6514.
b.
In the CA Certificate field, click
to select a TLS certificate. After
importing the certificate, you may:
Click Show to view its contents.
Click Remove to delete it if it is inappropriate.
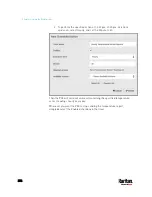
c.
Determine whether to select the "Allow expired and not yet valid certificates" checkbox.
To always send the event message to the specified syslog server as long as a TLS
certificate is available, select this checkbox.
To prevent the event message from being sent to the specified syslog server when
any TLS certificate in the selected certificate chain is outdated or not valid yet,
deselect this checkbox.
Note: If the required certificate file is a chain of certificates, and you are
not sure about the requirements of a certificate chain, see
TLS
Certificate Chain
(on page 817).
Содержание PX3-3000 series
Страница 5: ......
Страница 18: ...Contents xviii Index 841...
Страница 66: ...Chapter 3 Initial Installation and Configuration 42 Number Device role Master device Slave 1 Slave 2 Slave 3...
Страница 93: ...Chapter 4 Connecting External Equipment Optional 69...
Страница 787: ...Appendix J RADIUS Configuration Illustration 763 Note If your PX3 uses PAP then select PAP...
Страница 788: ...Appendix J RADIUS Configuration Illustration 764 10 Select Standard to the left of the dialog and then click Add...
Страница 789: ...Appendix J RADIUS Configuration Illustration 765 11 Select Filter Id from the list of attributes and click Add...
Страница 792: ...Appendix J RADIUS Configuration Illustration 768 14 The new attribute is added Click OK...
Страница 793: ...Appendix J RADIUS Configuration Illustration 769 15 Click Next to continue...
Страница 823: ...Appendix K Additional PX3 Information 799...
Страница 853: ...Appendix L Integration 829 3 Click OK...


