Chapter 6: Using the Web Interface
138
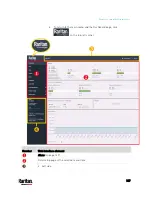
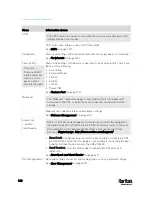
Number
Web interface element
- PX3 device name.
Note: To customize the device name, see
PDU
(on page 157).
Right side:
- Your login name, which you can click to view your user account settings.
- Logout button.
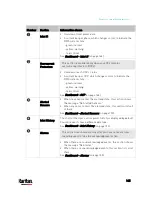
From top to bottom --
Your PX3 model.
Current firmware version.
Online Documentation: link to the PX3 online help.
- See
Browsing through the Online Help
(on page 824).
Raritan Support: link to the Raritan Technical Support webpage.
Date and time of your user account's last login.
- Click Last Login to view your login history.
PX3 system time, which is converted to the time zone of your computer or
mobile device.
- Click Device Time to open the Date/Time setup page.
Содержание PX3-3000 series
Страница 5: ......
Страница 18: ...Contents xviii Index 841...
Страница 66: ...Chapter 3 Initial Installation and Configuration 42 Number Device role Master device Slave 1 Slave 2 Slave 3...
Страница 93: ...Chapter 4 Connecting External Equipment Optional 69...
Страница 787: ...Appendix J RADIUS Configuration Illustration 763 Note If your PX3 uses PAP then select PAP...
Страница 788: ...Appendix J RADIUS Configuration Illustration 764 10 Select Standard to the left of the dialog and then click Add...
Страница 789: ...Appendix J RADIUS Configuration Illustration 765 11 Select Filter Id from the list of attributes and click Add...
Страница 792: ...Appendix J RADIUS Configuration Illustration 768 14 The new attribute is added Click OK...
Страница 793: ...Appendix J RADIUS Configuration Illustration 769 15 Click Next to continue...
Страница 823: ...Appendix K Additional PX3 Information 799...
Страница 853: ...Appendix L Integration 829 3 Click OK...


