Chapter 6: Using the Web Interface
359
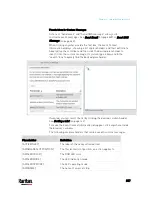
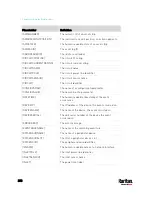
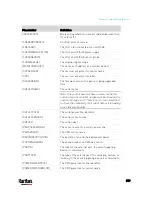
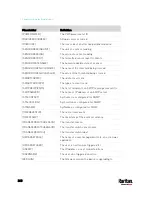
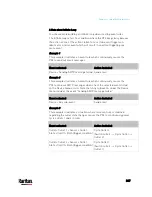
Placeholder
Definition
[ISASSERTED] Boolean
flag
whether
an event condition became true
(1) or false (0)
[LDAPERRORDESC]
An LDAP error occurred
[LHXFANID]
The ID of a fan connected to an LHX/SHX
[LHXPOWERSUPPLYID]
The ID of an LHX/SHX power supply
[LHXSENSORID]
The ID of an LHX/SHX sensor probe
[LOGMESSAGE] The
original log message
[MONITOREDHOST]
The name or IP address of a monitored host
[OCPSENSOR]
The overcurrent protector sensor name
[OCP]
The overcurrent protector label
[OLDVERSION]
The firmware version the device is being upgraded
from
[OUTLETNAME]
The outlet name
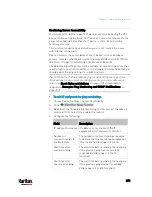
Note: If any outlet does not have a name, neither an
outlet name nor an outlet number will be shown in the
custom message for it. Therefore, it is recommended
to check the availability of all outlet names if intending
to use this placeholder.
[OUTLETPOLE]
The outlet power line identifier
[OUTLETSENSOR]
The outlet sensor name
[OUTLET]
The outlet label
[PDUPOLESENSOR]
The sensor name for a certain power line
[PDUSENSOR]
The PDU sensor name
[PERIPHDEVPOSITION]
The position of an attached peripheral device
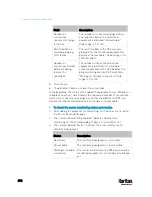
[PHONENUMBER]
The phone number an SMS was sent to
[PORTID]
The label of the external port, the event triggering
device is connected to
[PORTTYPE]
The type of the external port (for example, 'feature' or
'auxiliary'), the event triggering device is connected to
[POWERMETERPOLE]
The PMC power meter line identifier
[POWERMETERSENSOR]
The PMC power meter sensor name
Содержание PX3-3000 series
Страница 5: ......
Страница 18: ...Contents xviii Index 841...
Страница 66: ...Chapter 3 Initial Installation and Configuration 42 Number Device role Master device Slave 1 Slave 2 Slave 3...
Страница 93: ...Chapter 4 Connecting External Equipment Optional 69...
Страница 787: ...Appendix J RADIUS Configuration Illustration 763 Note If your PX3 uses PAP then select PAP...
Страница 788: ...Appendix J RADIUS Configuration Illustration 764 10 Select Standard to the left of the dialog and then click Add...
Страница 789: ...Appendix J RADIUS Configuration Illustration 765 11 Select Filter Id from the list of attributes and click Add...
Страница 792: ...Appendix J RADIUS Configuration Illustration 768 14 The new attribute is added Click OK...
Страница 793: ...Appendix J RADIUS Configuration Illustration 769 15 Click Next to continue...
Страница 823: ...Appendix K Additional PX3 Information 799...
Страница 853: ...Appendix L Integration 829 3 Click OK...

