Appendix C: Configuration or Firmware Upgrade with a USB Drive
673
devices.csv
If there are device-specific settings to configure, you must create a
device list configuration file -
devices.csv, to store unique data of each
PX3.
This file must be:
A CSV (comma-separated values) format file exported from a
spreadsheet application like Excel.
Copied to the root directory.
Referenced in the
device_list option of the "fwupdate.cfg" file. See
fwupdate.cfg
(on page 667).
Every PX3 identifies its entry in the "devicelist.csv" file by comparing its
serial number or MAC address to one of the columns in the file.
Determine the column to identify PX3 devices:
By default, a PX3 searches for its serial number in the 1st column.
To override the default, set the
match option in the "fwupdate.cfg"
file to a different column.
Syntax:
Prior to release 3.1.0, only single-line values containing NO commas
are supported. A comma is considered a field delimiter.
For example:
Value-1,Value-2,Value-3
As of release 3.1.0, values containing commas, line breaks or double
quotes are all supported. The commas and line breaks to be
included in the values must be enclosed in double quotes. Every
double quote to be included in the value must be escaped with
another double quote.
For example:
Value-1,"Value-2,with,three,commas",Value-3
Value-1,"Value-2,""with""three""double-quotes",Valu
e-3
Value-1,"Value-2
with a line break", Value-3
Содержание PX3-3000 series
Страница 5: ......
Страница 18: ...Contents xviii Index 841...
Страница 66: ...Chapter 3 Initial Installation and Configuration 42 Number Device role Master device Slave 1 Slave 2 Slave 3...
Страница 93: ...Chapter 4 Connecting External Equipment Optional 69...
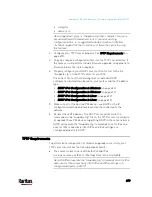
Страница 787: ...Appendix J RADIUS Configuration Illustration 763 Note If your PX3 uses PAP then select PAP...
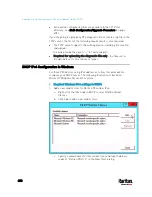
Страница 788: ...Appendix J RADIUS Configuration Illustration 764 10 Select Standard to the left of the dialog and then click Add...
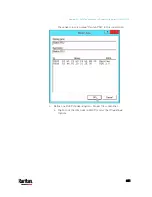
Страница 789: ...Appendix J RADIUS Configuration Illustration 765 11 Select Filter Id from the list of attributes and click Add...
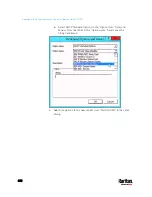
Страница 792: ...Appendix J RADIUS Configuration Illustration 768 14 The new attribute is added Click OK...
Страница 793: ...Appendix J RADIUS Configuration Illustration 769 15 Click Next to continue...
Страница 823: ...Appendix K Additional PX3 Information 799...
Страница 853: ...Appendix L Integration 829 3 Click OK...


