Appendix C: Configuration or Firmware Upgrade with a USB Drive
669
The PX3 beeps after it finishes writing the diagnostic data to the USB
drive.
factory_reset
If this option is set to
true
, the PX3 will be reset to factory defaults.
If the device configuration will be updated at the same time, the
factory reset will be executed before updating the device
configuration.
bulk_config_restore
Specify the name of the bulk configuration file used to configure or
restore the PX3.
Note: See
Bulk Configuration
(on page 401) for instructions on
generating a bulk configuration file.
Additional configuration keys set via the
config.txt file will be applied
after performing the bulk restore operation.
This option CANNOT be used with the option "full_config_restore."
If a firmware upgrade will be performed at the same time, you must
generate the bulk configuration file based on the NEW firmware
version instead of the current firmware version.
full_config_restore
Specify the name of the full configuration backup file used to restore
the PX3.
Note: See
Backup and Restore of Device Settings
(on page 408) for
instructions on generating the full configuration backup file.
Additional configuration keys set via the
config.txt file will be applied
after performing the configuration restore operation.
This option CANNOT be used with the option "bulk_config_restore."
If a firmware upgrade will be performed at the same time, you must
generate the full configuration backup file based on the NEW
firmware version instead of the current firmware version.
switch_outlets
This feature works on outlet-switching capable models only.
Switch on or off specific outlets.
The option's value comprises outlet numbers and the setting "on" or
"off" as explained below:
Each "on" or "off" setting consists of three parts: outlet numbers,
a colon, and the word "on" or "off".
Each "on" or "off" setting is separated with a semicolon.
Содержание PX3-3000 series
Страница 5: ......
Страница 18: ...Contents xviii Index 841...
Страница 66: ...Chapter 3 Initial Installation and Configuration 42 Number Device role Master device Slave 1 Slave 2 Slave 3...
Страница 93: ...Chapter 4 Connecting External Equipment Optional 69...
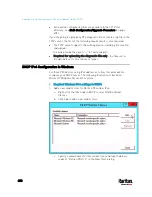
Страница 787: ...Appendix J RADIUS Configuration Illustration 763 Note If your PX3 uses PAP then select PAP...
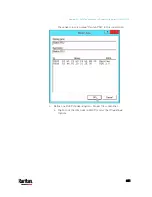
Страница 788: ...Appendix J RADIUS Configuration Illustration 764 10 Select Standard to the left of the dialog and then click Add...
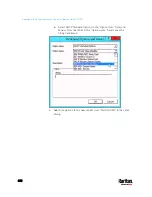
Страница 789: ...Appendix J RADIUS Configuration Illustration 765 11 Select Filter Id from the list of attributes and click Add...
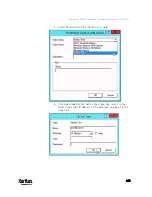
Страница 792: ...Appendix J RADIUS Configuration Illustration 768 14 The new attribute is added Click OK...
Страница 793: ...Appendix J RADIUS Configuration Illustration 769 15 Click Next to continue...
Страница 823: ...Appendix K Additional PX3 Information 799...
Страница 853: ...Appendix L Integration 829 3 Click OK...


