Chapter 3: Initial Installation and Configuration
48
All internal sensors become "unavailable", including sensors of
inlets, outlets, and OCPs.
Exception: Only active energy data remains available.
Communications with relay/meter boards are lost. Therefore,
firmware upgrade may fail due to this reason.
Available data or operations on the PDU that enters the
power-sharing mode:
Change software settings, such as customizing names, modifying
network settings, configuring thresholds, and so on.
Note: Outlet switching is not available because all outlets lose
power.
Monitor the status of connected Raritan environmental sensor
packages, or configure/control their settings.
Operate the front panel display.
Events that occur when entering the power-sharing mode:
The 12V power supply sensor enters the fault state. See
+12V Power
Supply Sensor (for iX7
™
Only)
(on page 167).
Tip: You can set an event rule for sending a notification when this
sensor enters the fault state. See
Event Rules and Actions
(on page
The above event is logged in the internal event log. See
Default Log
Messages
(on page 319).
To find whether an iX7
™
has entered the power-sharing mode:
Check the state of its +12V power supply sensor.
Tip: For SNMP, the sensor type for this +12V power supply is
i1smpsStatus (46).
Making a Power-Sharing Connection
Make sure BOTH iX7
™
devices comply with the configuration limitations
when establishing a power-sharing connection. See
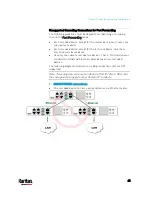
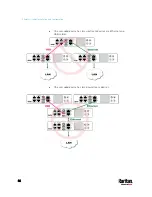
Power-Sharing
Configurations and Restrictions
(on page 49).
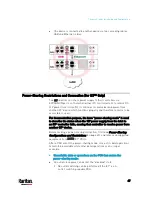
The supported maximum power-sharing distance is 2 meters.
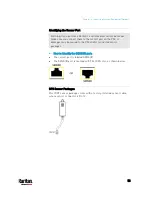
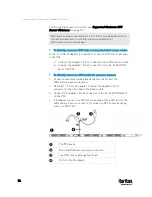
Make a power-sharing connection:
1.
Get a standard network patch cable (Cat5e/6), which can be up to 2
meters long.
Do NOT use a crossover cable.
Содержание PX3-3000 series
Страница 5: ......
Страница 18: ...Contents xviii Index 841...
Страница 66: ...Chapter 3 Initial Installation and Configuration 42 Number Device role Master device Slave 1 Slave 2 Slave 3...
Страница 93: ...Chapter 4 Connecting External Equipment Optional 69...
Страница 787: ...Appendix J RADIUS Configuration Illustration 763 Note If your PX3 uses PAP then select PAP...
Страница 788: ...Appendix J RADIUS Configuration Illustration 764 10 Select Standard to the left of the dialog and then click Add...
Страница 789: ...Appendix J RADIUS Configuration Illustration 765 11 Select Filter Id from the list of attributes and click Add...
Страница 792: ...Appendix J RADIUS Configuration Illustration 768 14 The new attribute is added Click OK...
Страница 793: ...Appendix J RADIUS Configuration Illustration 769 15 Click Next to continue...
Страница 823: ...Appendix K Additional PX3 Information 799...
Страница 853: ...Appendix L Integration 829 3 Click OK...


