


Chapter 6: Using the Web Interface
266
Note that if either setting below is incorrectly configured, a
networking issue occurs.
Field
Description
Role
(available on all
cascaded devices)
Master or Slave.
This is to determine which device is the
master and which ones are slave
devices.
Downstream interface
(available on the maser
device only)
USB or ETHERNET (or ETH1/ETH2).
This is to determine which port on the
master device is connected to Slave 1.
Always select USB for PX3, but you can
select either USB or Ethernet
(Eth1/Eth2) for iX7 models.
If Ethernet (Eth1/Eth2) is selected as the
downstream interface, make sure the
selected Ethernet interface is enabled.
6.
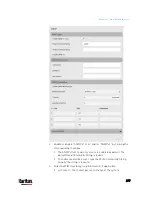
(Optional) Configure the network settings by clicking the BRIDGE,
ETHERNET (or ETH1/ETH2), or WIRELESS section on the same page.
In the Bridging mode, each cascaded device can have different
network settings. You may need to configure each device's
network settings in the BRIDGE section.
In the Port Forwarding mode, all cascaded devices share the
master device's network settings. You only need to configure the
master device's network settings in the ETHERNET (or
ETH1/ETH2) and/or WIRELESS section.
See
Wired Network Settings
(on page 252) or
Wireless Network
Settings
(on page 255)
Tip: You can enable/configure multiple network interfaces in the Port
Forwarding mode so that the cascading chain has multiple IP
addresses.
7.
Click Save.
For information on accessing each cascaded device in the Port
Forwarding mode, see
Port Forwarding Examples
(on page 270).
Enable R/STP if a cascade loop is preferred:
You can "loop" a cascading chain to create network communication
redundancy (Bridging mode only), but only when your network
supports R/STP protocol.
Make sure that your network has R/STP enabled if using a cascade
Содержание PX3-3000 series
Страница 5: ......
Страница 18: ...Contents xviii Index 841...
Страница 66: ...Chapter 3 Initial Installation and Configuration 42 Number Device role Master device Slave 1 Slave 2 Slave 3...
Страница 93: ...Chapter 4 Connecting External Equipment Optional 69...
Страница 787: ...Appendix J RADIUS Configuration Illustration 763 Note If your PX3 uses PAP then select PAP...
Страница 788: ...Appendix J RADIUS Configuration Illustration 764 10 Select Standard to the left of the dialog and then click Add...
Страница 789: ...Appendix J RADIUS Configuration Illustration 765 11 Select Filter Id from the list of attributes and click Add...
Страница 792: ...Appendix J RADIUS Configuration Illustration 768 14 The new attribute is added Click OK...
Страница 793: ...Appendix J RADIUS Configuration Illustration 769 15 Click Next to continue...
Страница 823: ...Appendix K Additional PX3 Information 799...
Страница 853: ...Appendix L Integration 829 3 Click OK...


