


GE Healthcare
Senographe DS
Revision 1
Service Information and Procedures Class A 2385072-16-8EN
Job Card TSG A012 - Use of DB9 Adaptors to Reduce Intermittent IDC or ADS Communication Errors
Page no. 1033
Chapter 9
JC-TSG-A-012.fm
8-2
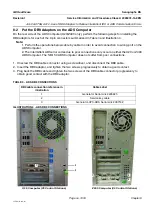
Put the DB9 Adaptors on the ADS Computer
On the rear side of the ADS Computer (U20/Z400 only), perform the following steps for installing the
DB9 adaptors for each of the 9 pin connectors summarized in Table
and Illustration
.
Note:
1. Perform the operations below cable by cable in order to avoid connection to wrong port on the
ADS Computer.
2. The intermittent ADS error codes due to poor connections only occur on either the U20 or Z400
ADS Computer. The SB-150 ADS Computer does not suffer from poor connections.
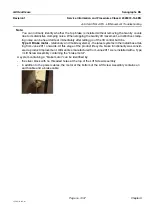
1. Unscrew the DB9 cable connector using a screwdriver, and disconnect the DB9 cable.
2. Insert the DB9 adaptor, and tighten the two screws progressively to obtain a good contact.
3. Plug back the DB9 cable and tighten the two screws of the DB9 cable connector progressively to
obtain good contact with the DB9 adaptor.
TABLE 3 - ADS DB9 CONNECTIONS
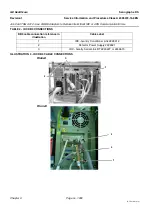
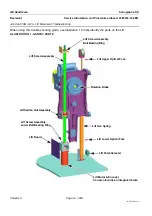
ILLUSTRATION 4 - ADS DB9 CONNECTIONS
DB9 cable connection reference in
illustration
Cable Label
1
Generator Serial Link 2226625
2
Service key cable
3
Generator-UPS-ADS Serial Link 2387162
2
1
3
1
3
2
U20 Computer (V3 Control Stations)
Z400 Computer (V4 Control Stations)


