


GE Healthcare
Senographe DS
Revision 1
Service Information and Procedures Class A 2385072-16-8EN
Job Card CAL A003 - X-Ray Tube Focal Bias Voltage Scale Factor
Page no. 1659
Chapter 9
JC-CAL-A-003.fm
a. Select
SETUP/GENE/INSTAL/GENE/GENE/BIAS/VOLTAGE/CHANGE
on the X-ray Con-
sole.
b. Enter 1.300E+2V and valid.
c. Press
SETUP/SETUP/SETUP/SETUP/CKSUM/CKSUM
on the X-ray Console to perform a
checksum.
d. Press
SETUP/SETUP/SETUP/SETUP
(i.e. 4 times) on the X-ray Console.
e. Select
30kV/LARGE/MO/MO
on the X-ray Console.
f. Do a preparation with the Prep button on the X-ray Console.
g. Check that the result is between 123.5 and 136.5Vdc.
h. Select
SETUP/GENE/INSTAL/GENE/GENE/BIAS/VOLTAGE/CHANGE
on the X-ray Con-
sole and enter the value corresponding to the MO/LF noted in the first check point.
7. Fourth check point:
a. Select
MO/SF
voltage parameter and note the actual value associated to the tube (see step
section
).
b. Enter 2.500E+2V and valid.
c. Press
SETUP/SETUP/SETUP/SETUP/CKSUM/CKSUM
on the X-ray Console to perform a
checksum.
d. Press
SETUP/SETUP/SETUP/SETUP
(i.e. 4 times) on the X-ray Console.
e. Select
30kV/SF/MO/MO
on the X-ray Console.
f. Do a preparation with the Prep button on the X-ray Console.
g. Check that the result is between 247 and 256Vdc.
8. Fifth check point:
a. Select
SETUP/GENE/INSTAL/GENE/GENE/BIAS/VOLTAGE/CHANGE
on the X-ray Con-
sole and enter the value corresponding to the MO/SF noted down on step
(fourth check point).
b. Select
MO/SF
voltage parameter and note the default value.
c. Enter 3.000E+2V and valid.
d. Press
SETUP/SETUP/SETUP/SETUP/CKSUM/CKSUM
on the X-ray Console to perform a
checksum.
e. Press
SETUP/SETUP/SETUP/SETUP
(i.e. 4 times) on the X-ray Console.
f. Select
30kV/SF/MO/MO
on the X-ray Console.
g. Do a preparation with the Prep button on the X-ray Console.
h. Check that the result is between 297 and 305Vdc.
i. Select
SETUP/GENE/INSTAL/GENE/GENE/BIAS/VOLTAGE
on the X-ray Console and select
MO/SF
.
j. Enter the value corresponding to the MO/SF value noted down on step
(fourth check point).
9. If the results are within the tolerances given, the focal bias voltage calibration is finished. If the results
are out of tolerance, repeat the calibration and check procedures.
10. Select
SETUP/SETUP/SETUP
/CALIB/PARAM
on the X-ray Console. Note down the calculated
values of parameters I, J, K, L, M and N. Each of these six values can be displayed alternately by
rotating the kV dial on the X-ray Console,
11. Delete the previously created patient called "X-ray Tube BIAS cal".
12. Perform a checksum (
SETUP/GENE/INSTAL/CKSUM/CKSUM
), then turn the system OFF.
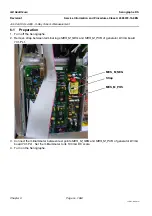
13. Remove the high voltage cable adapter. Remember to secure the HV ring correctly using the allen


