Chapter 9
Page no. 1354
JC-DR-A-261.fm
GE Healthcare
Senographe DS
Revision 1
Service Information and Procedures Class A 2385072-16-8EN
Job Card D/R A261 - X-ray Tube Assembly
6-1
Removal of X-ray Tube Housing
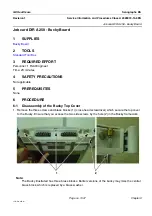
1. Release and remove the four screws securing the upper
spacer (1) (4 mm allen wrench).
2. Release and remove the screws (2) securing the tilt
assembly (5 mm allen wrench).
CAUTION
Before proceeding, ensure that the arm is horizon-
tal, and that the tube assembly is supported so
that it does not fall when the pivots are removed.
3. Remove the pivots (3) on both sides:
•
Release and remove the two screws securing the right
pivot (2 mm allen wrench).
•
Release and remove the three screws securing the left
pivot (2 mm allen wrench).
•
Pull out and remove the pivots. The pivots are tapped (x mm thread) so that a screw can be
inserted and used to pull the pivot out of its housing.
4. Remove housing by gently pulling out the tube head, interface plate, and filter wheel ( all together)
and place them on a suitable trolley. The X-ray tube must be held by the HV female connector, and
not
by the HV cable.
5. Release and remove the two screws securing the filter wheel to the interface plate.
CAUTION
Do not touch the molybdenum and rhodium filters with fingers.
6. Release and remove the two screws securing the
interface plate to the tube head.
7. Disconnect the HT connector (5) from the housing.
8. Disconnect the stator cable connector (4).
9. Remove one ground cable (6) from the grounding
points.
10. On the Interface board PL104, unplug cable W402
(connector J4).
1
2
3
5
4
6

