8' x 10' Chicken Coop Plan
Up to
30
chicken
s
Страница 1: ...8 x 10 Chicken Coop Plan Up to 30 chickens...
Страница 2: ...ges 41 Illustrations for Each Step 0 0 Print Ready 0 0 Step By Step Instructions 0 0 Full Materials and Cuttings List 0 0 Additional Illustrations 0 0 Additional Blueprints 0 0 Tools List 0 0 Fastenin...
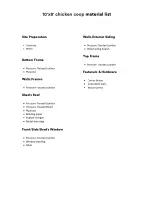
Страница 3: ...ed Lumber Wood siding boards Walls Frames Pressure Treated Lumber Top Frame Pressure Treated Lumber Shed s Roof Pressure Treated Lumber Pressure Treated Board Plywood Building paper Asphalt shingles M...
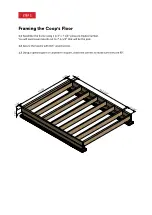
Страница 4: ...pressure treated lumber You will need seven boards cut to 7 6 1 4 that will be the joist 1 2 Secure the beams with 8x3 wood screws 1 3 Using a speed square or carpenter s square check the corners to m...
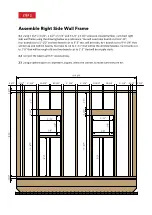
Страница 5: ...ds cut to 9 9 1 4 that will be top and bottom beams four boards cut to 1 11 that will be the window headers two boards cut to 1 8 that will be rough sills and two boards cut to 1 5 that will be crippl...
Страница 6: ...op and bottom beams four boards cut to 1 11 that will be the window headers two boards cut to 1 8 that will be rough sills two boards cut to 1 5 that will be cripple studs and one board cut to 1 1 4 t...
Страница 7: ...ards cut to 5 10 1 2 that will be studs two boards cut to 2 3 1 4 that will be the bottom beams one board cut to 7 2 1 4 that will be the top beam two boards cut to 2 11 that will be the door header a...
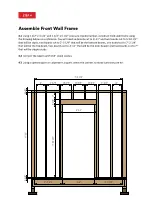
Страница 8: ...wall frame using the drawing below as a reference You will need seven boards cut to 6 11 that will be the studs and two boards cut to 7 2 1 4 that will be the top and bottom beams 5 2 Connect the bea...
Страница 9: ...1 2 x 3 1 2 pressure treated lumber cut seven collar ties 5 long according to the dimensions in drawings below 6 3 Using 1 1 2 x 5 1 2 pressure treated board cut one board 10 3 4 long one board 6 long...
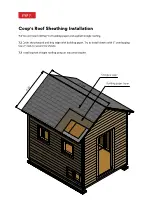
Страница 10: ...ng paper and asphalt shingle roofing 7 2 Cover the plywood and drip edge with building paper Try to install sheets with 1 overlapping Use 2 nails to secure the sheets 7 3 Install asphalt shingle roofi...
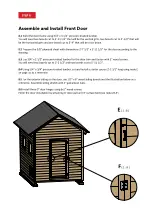
Страница 11: ...e 3 4 x 2 1 2 pressure treated lumber for the door trim and fasten with 2 wood screws You will need two boards cut to 2 2 1 2 and two boards cut to 5 11 1 2 8 4 Using 1 4 x 3 4 pressure treated lumber...
Страница 12: ...need four boards cut to 1 7 1 2 that will be the vertical and horizontal girts Cut the recesses in each beam for splicing connection and mill a recess for the glass 9 2 Prepare and install 1 5 1 4 x...
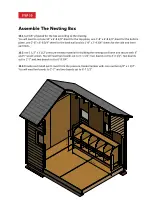
Страница 13: ...sheets for the side and inner partitions 10 2 Use 1 1 2 x 3 1 2 pressure treated material for building the nesting box frame and secure with 3 and 5 wood screws You will need two boards cut to 3 1 1 2...
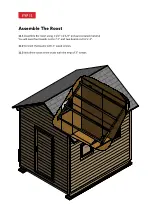
Страница 14: ...semble the roost using 1 1 2 x 2 1 2 pressure treated material You will need four boards cut to 7 1 and two boards cut to 5 3 11 2 Connect the beams with 2 wood screws 11 3 Install the roost at the st...
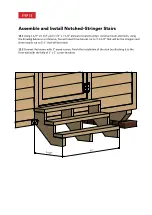
Страница 15: ...airs elements using the drawing below as a reference You will need three boards cut to 1 9 1 4 that will be the stringers and three boards cut to 3 1 that will be treads 12 2 Connect the beams with 3...
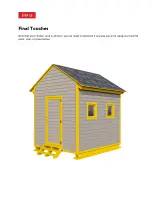
Страница 16: ...STEP 13 Final Touches Now that your chicken coop is all done you are ready to decorate it any way you want using your favorite paint stain or preservative...
Страница 17: ...ges 41 Illustrations for Each Step 0 0 Print Ready 0 0 Step By Step Instructions 0 0 Full Materials and Cuttings List 0 0 Additional Illustrations 0 0 Additional Blueprints 0 0 Tools List 0 0 Fastenin...
Страница 18: ...lication sale or distribution of any portion of these plans without prior written consent from the original designer will be subject to the appropriate penalties for copyright infringement Sharing thi...