Chapter 9
Page no. 1684
JC-CAL-A-029.fm
GE Healthcare
Senographe DS
Revision 1
Service Information and Procedures Class A 2385072-16-8EN
Job Card CAL A029 - Collimator Format Calibration
6-2-1
Displayed angle greater than 2
•
Calibration is not possible. The collimator must be reinstalled and the calibration repeated:
1. Click the on-screen
CANCEL
button to terminate the calibration.
2. Remove and reinstall the collimator.
3. Restart the calibration as described above.
6-2-2
Displayed angle less than 2 but greater than 0.1
•
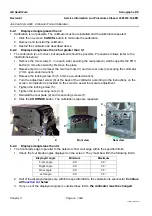
The calibration is not correct, but adjustment should be possible. Proceed as follows (refer to the
illustrations below):
1. Remove the two screws (1, one each side) securing the rear plate (2) which supports the FOV
button (4 mm allen wrench). Remove the plate.
2. Release (but do not remove) the two front nuts (3) and two rear nuts (4) securing the collimator
(7 mm open-ended wrench).
3. Release the locking screw (5) (5.5 mm open-ended wrench).
4. Turn the adjustment screw (6) at the back of the collimator according to the instructions on the
screen. An indicator is provided on the screw to assist in accurate adjustment.
5. Tighten the locking screw (5).
6. Tighten the four securing nuts (3, 4).
7. Reinstall the rear plate (2) and its securing screws (1).
8. Click the
CONTINUE
button. The calibration steps are repeated.
6-2-3
Displayed angle less than 0.1
•
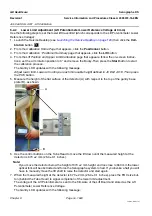
The front blade edge is parallel to the detector chest wall edge within the specified limits.
1. Check the four blade angles displayed on the screen. They must be within the following limits:
2. If all of the displayed angles are within the specified limits, the calibration is successful.
Continue
below
.
3. If any one of the displayed angles is outside these limits,
the collimator must be changed
.
Displayed angle
Minimum
Maximum
Front angle
-0.5°
0.5°
Right angle
-0.5°
0.5°
Rear angle
-0.5°
0.5°
Left angle
-0.5°
0.5°
2
1
3
Front view
4
5
Rear view
Up/down
6

