Linking Revit Models
1
Click File menu
➤
Import/Link
➤
Revit.
2
In the Import/Link RVT dialog, navigate to the folder containing the Revit model to link.
3
Select the model.
4
Specify the desired positioning options. See
Import Options for CAD Formats and Revit Models
on page 1312.
5
Click Open.
You can select the linked Revit model in a view and drag, copy, paste, move, and rotate it.
Showing or Hiding Nested Linked Revit Models
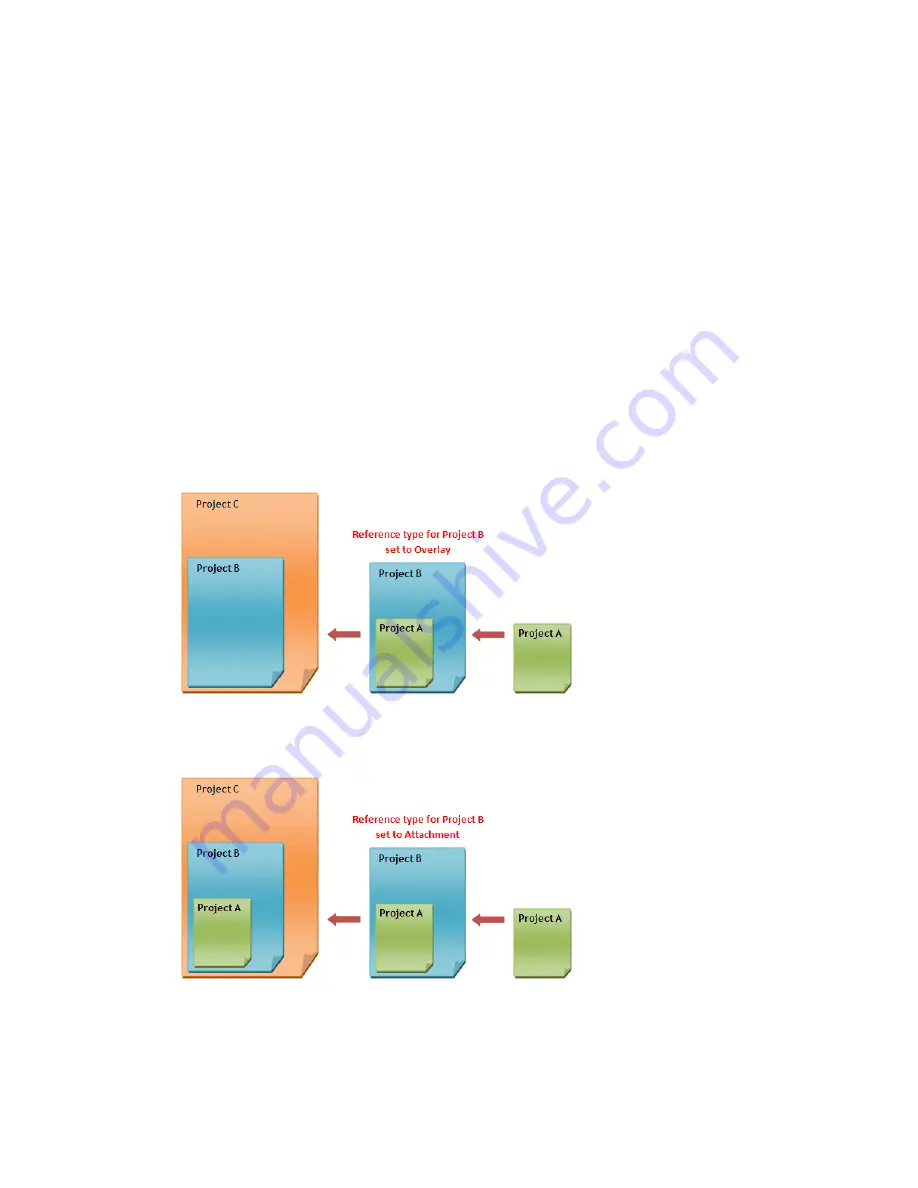
When you import a model that contains linked models, the nested links display according to the Reference
Type setting in their parent model. Options are Overlay and Attachment. Overlay does not load nested
linked models (therefore they do not display in the project) and Attachment displays nested linked models.
The following image shows that Project A is linked into Project B (so Project B is the parent link for Project
A). The Reference Type setting for Project B is Overlay, therefore when Project B is imported into Project C,
Project A does not display.
If you change the Reference Type setting for Project B to Attachment, when you import Project B into Project
C, the nested link (Project A) displays.
To show or hide nested linked models:
1
Open the parent link for the nested model.
Linking Revit Models | 1215
Summary of Contents for 24000-000000-9860 - Revit Architecture - PC
Page 1: ...Revit Architecture 2009 User s Guide April 2008 240A1 050000 PM02A ...
Page 4: ......
Page 56: ...18 ...
Page 116: ...78 Chapter 3 Revit Essentials ...
Page 172: ...134 Chapter 4 ProjectViews ...
Page 178: ...Schedule with Grid Lines Schedule with Grid Lines and an Outline 140 Chapter 4 ProjectViews ...
Page 554: ...516 ...
Page 739: ...Curtain wall Curtain Grid Curtain Walls Curtain Grids and Mullions 701 ...
Page 1004: ...966 ...
Page 1136: ...1098 ...
Page 1226: ...1188 ...
Page 1250: ...1212 ...
Page 1276: ...1238 Chapter 20 Design Options ...
Page 1310: ...1272 ...
Page 1366: ...1328 ...
Page 1406: ...1368 ...


