COPYRIGHT © 1999 CANON INC. CANON imageRUNNER 400/330 REV.0 JAN. 1999 PRINTED IN JAPAN (IMPRIME AU JAPON)
9-29
CHAPTER 9 FIXING SYSTEM
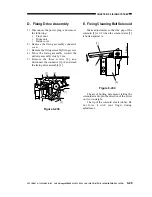
D. Fixing Drive Assembly
1) Disconnect the power plug, and remove
the following:
Front door
Drum unit
Inside cover
2) Remove the fixing assembly connector
cover.
3) Remove the fixing assembly fixing screw.
4) Move the fixing assembly toward the
delivery assembly side by 3 cm.
5) Remove the three screws [2], and
disconnect the connector [3]; then, detach
the fixing drive assembly [1].
Figure 9-239
E. Fixing Cleaning Belt Solenoid
Make adjustments so that the gap of the
solenoid [2] is 0.2 when the solenoid arm [1]
is butted against A.
Figure 9-240
The act of butting here means letting the
solenoid arm drop in the direction of the arrow
on its own weight.
The tip of the solenoid arm is rubber. Do
not force it with your finger during
adjustment.
[3]
[2]
[1]
[2]
0.2mm
A
[2]
[1]

