


777
This section provides an LDAP example for illustrating the configuration
procedure using Microsoft Active Directory
®
(AD). To configure LDAP
authentication, four main steps are required:
a.
Determine user accounts and roles (groups) intended for the PX3TS
b.
Create user groups for the PX3TS on the AD server
c.
Configure LDAP authentication on the PX3TS
d.
Configure roles on the PX3TS
Important: Raritan disables SSL 3.0 and uses TLS due to published security
vulnerabilities in SSL 3.0. Make sure your network infrastructure, such as
LDAP and mail services, uses TLS rather than SSL 3.0.
In This Chapter
Step A. Determine User Accounts and Roles .................................................... 777
Step B. Configure User Groups on the AD Server ............................................. 778
Step C. Configure LDAP Authentication on the PX3TS ...................................... 779
Step D. Configure Roles on the PX3TS .............................................................. 782
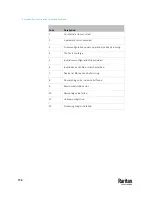
Step A. Determine User Accounts and Roles
Determine the user accounts and roles (groups) that are authenticated for
accessing the PX3TS. In this example, we will create two user roles with
different permissions. Each role (group) will consist of two user accounts
available on the AD server.
User roles
User accounts (members)
PX_User
usera
pxuser2
PX_Admin
userb
pxuser
Group permissions:
•
The PX_User role will have neither system permissions nor outlet
permissions.
•
The PX_Admin role will have full system and outlet permissions.
Appendix G LDAP Configuration Illustration
Содержание Raritan PX3TS
Страница 4: ......
Страница 6: ......
Страница 20: ......
Страница 52: ...Chapter 3 Initial Installation and Configuration 32 Number Device role Master device Slave 1 Slave 2 Slave 3...
Страница 80: ...Chapter 4 Connecting External Equipment Optional 60...
Страница 109: ...Chapter 5 PDU Linking 89...
Страница 117: ...Chapter 5 PDU Linking 97...
Страница 440: ...Chapter 7 Using the Web Interface 420 If wanted you can customize the subject and content of this email in this action...
Страница 441: ...Chapter 7 Using the Web Interface 421...
Страница 464: ...Chapter 7 Using the Web Interface 444...
Страница 465: ...Chapter 7 Using the Web Interface 445 Continued...
Страница 746: ...Appendix A Specifications 726...
Страница 823: ...Appendix I RADIUS Configuration Illustration 803 Note If your PX3TS uses PAP then select PAP...
Страница 824: ...Appendix I RADIUS Configuration Illustration 804 10 Select Standard to the left of the dialog and then click Add...
Страница 825: ...Appendix I RADIUS Configuration Illustration 805 11 Select Filter Id from the list of attributes and click Add...
Страница 828: ...Appendix I RADIUS Configuration Illustration 808 14 The new attribute is added Click OK...
Страница 829: ...Appendix I RADIUS Configuration Illustration 809 15 Click Next to continue...
Страница 860: ...Appendix J Additional PX3TS Information 840...
Страница 890: ...Appendix K Integration 870 3 Click OK...
Страница 900: ......


