


Chapter 7: Using the Web Interface
453
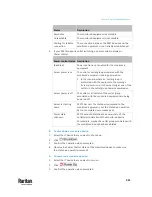
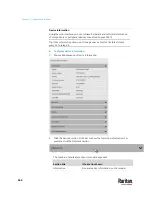
Field
Data entered
Wait time after successful ping
5
▪
To make the PX3TS declare the inaccessibility of the monitored PDU
when that PDU becomes inaccessible for around 12 seconds (4
seconds * 3 pings), enter the following data.
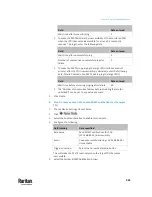
Field
Data entered
Wait time after unsuccessful ping
4
Number of consecutive unsuccessful pings for
failure
3
▪
To make the PX3TS stop pinging the target PDU for 60 seconds (1
minute) after the PDU inaccessibility is declared, enter the following
data. After 60 seconds, the PX3TS will re-ping the target PDU,
Field
Data entered
Wait time before resuming pinging after failure
60
▪
The "Number of consecutive failures before disabling feature (0 =
unlimited)" can be set to any value you want.
5.
Click Create.
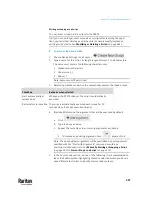
Step 2: Create an event rule to send SNMP notifications for the target
PDU
1.
Choose Device Settings > Event Rules.
2.
Click
.
3.
Select the Enabled checkbox to enable this new rule.
4.
Configure the following.
Field/setting
Data specified
Rule name
Send SNMP notifications for PDU
(192.168.84.95) inaccessibility
Event
Choose Server Monitoring > 192.168.84.95 >
Unreachable
Trigger condition
Select the Unreachable radio button
This will make the PX3TS react only when the target PDU becomes
inaccessible.
5.
Select the System SNMP Notification Action.
Содержание Raritan PX3TS
Страница 4: ......
Страница 6: ......
Страница 20: ......
Страница 52: ...Chapter 3 Initial Installation and Configuration 32 Number Device role Master device Slave 1 Slave 2 Slave 3...
Страница 80: ...Chapter 4 Connecting External Equipment Optional 60...
Страница 109: ...Chapter 5 PDU Linking 89...
Страница 117: ...Chapter 5 PDU Linking 97...
Страница 440: ...Chapter 7 Using the Web Interface 420 If wanted you can customize the subject and content of this email in this action...
Страница 441: ...Chapter 7 Using the Web Interface 421...
Страница 464: ...Chapter 7 Using the Web Interface 444...
Страница 465: ...Chapter 7 Using the Web Interface 445 Continued...
Страница 746: ...Appendix A Specifications 726...
Страница 823: ...Appendix I RADIUS Configuration Illustration 803 Note If your PX3TS uses PAP then select PAP...
Страница 824: ...Appendix I RADIUS Configuration Illustration 804 10 Select Standard to the left of the dialog and then click Add...
Страница 825: ...Appendix I RADIUS Configuration Illustration 805 11 Select Filter Id from the list of attributes and click Add...
Страница 828: ...Appendix I RADIUS Configuration Illustration 808 14 The new attribute is added Click OK...
Страница 829: ...Appendix I RADIUS Configuration Illustration 809 15 Click Next to continue...
Страница 860: ...Appendix J Additional PX3TS Information 840...
Страница 890: ...Appendix K Integration 870 3 Click OK...
Страница 900: ......


