
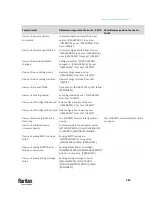


Chapter 7: Using the Web Interface
396
Action
Function
Request LHX/SHX
maximum cooling
Applies the maximum cooling to the LHX/SHX
device. See
Request LHX/SHX Maximum Cooling
(on page 403).
This option is available only when the Schroff
LHX/SHX support has been enabled.
Send email
Emails a textual message. See
Send Email
(on page
404).
Send sensor report
Reports the readings or status of the selected
sensors, including internal or external sensors. See
Send Sensor Report
(on page 406).
Send SMS message
Sends a message to a mobile phone. See
Send SMS
Message
(on page 408).
Send snapshots via
email
Emails the snapshots captured by a connected
Logitech
®
webcam (if available). See
Send
Snapshots via Email
(on page 409).
Send SNMP notification Sends SNMP traps or informs to one or multiple
SNMP destinations. See
Send an SNMP
Notification
(on page 411).
Start/stop Lua script
If you are a developer who can create a Lua script,
you can upload it to the PX3TS, and have the PX3TS
automatically perform or stop the script in
response to an event. See
Start or Stop a Lua
Script
(on page 412).
Switch LHX/SHX
Switches on or off the LHX/SHX device. See
Switch
LHX/SHX
(on page 413).
This option is available only when the Schroff
LHX/SHX support has been enabled.
Switch outlets
Switches on, off or cycles the power to the
specified outlet(s). See
Switch Outlets
(on page
414).
Switch outlet group
Switches on, off or cycles the power to all outlets
of the specified outlet group. See
Switch Outlet
Group
(on page 413).
Switch peripheral
actuator
Switches on or off the mechanism or system
connected to the specified actuator. See
Switch
Peripheral Actuator
(on page 414).
Syslog message
Makes the PX3TS automatically forward event
messages to the specified syslog server. See
Syslog
Message
(on page 415).
Содержание Raritan PX3TS
Страница 4: ......
Страница 6: ......
Страница 20: ......
Страница 52: ...Chapter 3 Initial Installation and Configuration 32 Number Device role Master device Slave 1 Slave 2 Slave 3...
Страница 80: ...Chapter 4 Connecting External Equipment Optional 60...
Страница 109: ...Chapter 5 PDU Linking 89...
Страница 117: ...Chapter 5 PDU Linking 97...
Страница 440: ...Chapter 7 Using the Web Interface 420 If wanted you can customize the subject and content of this email in this action...
Страница 441: ...Chapter 7 Using the Web Interface 421...
Страница 464: ...Chapter 7 Using the Web Interface 444...
Страница 465: ...Chapter 7 Using the Web Interface 445 Continued...
Страница 746: ...Appendix A Specifications 726...
Страница 823: ...Appendix I RADIUS Configuration Illustration 803 Note If your PX3TS uses PAP then select PAP...
Страница 824: ...Appendix I RADIUS Configuration Illustration 804 10 Select Standard to the left of the dialog and then click Add...
Страница 825: ...Appendix I RADIUS Configuration Illustration 805 11 Select Filter Id from the list of attributes and click Add...
Страница 828: ...Appendix I RADIUS Configuration Illustration 808 14 The new attribute is added Click OK...
Страница 829: ...Appendix I RADIUS Configuration Illustration 809 15 Click Next to continue...
Страница 860: ...Appendix J Additional PX3TS Information 840...
Страница 890: ...Appendix K Integration 870 3 Click OK...
Страница 900: ......


