


Chapter 7: Using the Web Interface
395
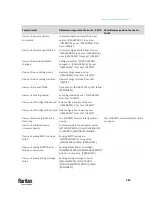
Note: The "Change load shedding state", "Power control server", "Switch
outlets" and "Switch outlet group" options are only available for
outlet-switching capable models.
Action
Function
Alarm
Requires the user to acknowledge the alert after it
is generated. If needed, you can have the alert
notifications regularly generated until a person
takes the acknowledgment action. See
Alarm
(on
page 397).
Change load shedding
state
Enters or quits the load shedding mode. See
Change Load Shedding State
(on page 398).
Execute an action
group
Creates a group of actions comprising existing
actions. See
Action Group
(on page 398).
External beeper
Enables or disables the connected external beeper,
or causes it to enter an alarm cycle. See
External
Beeper
(on page 399).
Internal beeper
Turns on or off the internal beeper. See
Internal
Beeper
(on page 399).
Log event message
Records the selected events in the internal log. See
Log an Event Message
(on page 400).
Power control server
Two operations are available.
▪
Shuts down a monitored server and then
powers off the outlet(s) associated with that
server.
▪
Powers up the outlet(s) associated with a
monitored server.
See
Shut down a Server and Control its Power
(on
page 400).
Push out sensor
readings
Sends internal sensor log, environmental sensor log
or asset management strip data to a remote server
using HTTP POST requests. See
Push Out Sensor
Readings
(on page 401).
Record snapshots to
webcam storage
Makes a connected webcam start or stop taking
snapshots. See
Record Snapshots to Webcam
Storage
(on page 401).
Содержание Raritan PX3TS
Страница 4: ......
Страница 6: ......
Страница 20: ......
Страница 52: ...Chapter 3 Initial Installation and Configuration 32 Number Device role Master device Slave 1 Slave 2 Slave 3...
Страница 80: ...Chapter 4 Connecting External Equipment Optional 60...
Страница 109: ...Chapter 5 PDU Linking 89...
Страница 117: ...Chapter 5 PDU Linking 97...
Страница 440: ...Chapter 7 Using the Web Interface 420 If wanted you can customize the subject and content of this email in this action...
Страница 441: ...Chapter 7 Using the Web Interface 421...
Страница 464: ...Chapter 7 Using the Web Interface 444...
Страница 465: ...Chapter 7 Using the Web Interface 445 Continued...
Страница 746: ...Appendix A Specifications 726...
Страница 823: ...Appendix I RADIUS Configuration Illustration 803 Note If your PX3TS uses PAP then select PAP...
Страница 824: ...Appendix I RADIUS Configuration Illustration 804 10 Select Standard to the left of the dialog and then click Add...
Страница 825: ...Appendix I RADIUS Configuration Illustration 805 11 Select Filter Id from the list of attributes and click Add...
Страница 828: ...Appendix I RADIUS Configuration Illustration 808 14 The new attribute is added Click OK...
Страница 829: ...Appendix I RADIUS Configuration Illustration 809 15 Click Next to continue...
Страница 860: ...Appendix J Additional PX3TS Information 840...
Страница 890: ...Appendix K Integration 870 3 Click OK...
Страница 900: ......


