


Chapter 7: Using the Web Interface
314
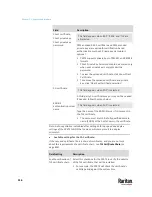
Field
Description
First/Second/Third
DNS server
Manually specify static DNS server(s).
▪
If any static DNS server is specified in these fields,
it will override the DHCP-assigned DNS server.
▪
If DHCP (or Automatic) is selected for IPv4/IPv6
settings, and there are NO static DNS servers
specified, the PX3TS will use DHCP-assigned DNS
servers.
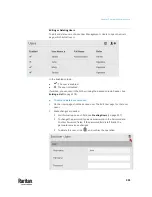
IPv4/IPv6 routes
You need to configure these settings only when your
local network contains two subnets, and you want
PX3TS to communicate with the other subnet.
If so, make sure IP forwarding has been enabled in
your network, and then you can click 'Add Route' to
add static routes.
See
Static Route Examples
(on page 324).
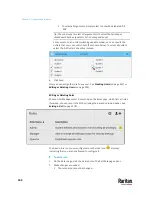
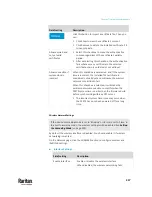
Ethernet Interface Settings
By default both ETH1 and ETH2 interfaces on PX3TS are enabled.
Enable Interface:
Make sure the Ethernet interface is enabled, or all networking through this
interface fails. This setting is available in the ETH1/ETH2 section, but not
available in the BRIDGE section.
Other Ethernet settings:
Field
Description
Speed
Select a LAN speed.
•
Auto:
System determines the optimum LAN speed
through auto-negotiation.
•
10 MBit/s:
Speed is always 10 Mbps.
•
100 MBit/s:
Speed is always 100 Mbps.
•
1 GBit/s:
Speed is always 1 Gbps (1000 Mbps).
Duplex
Select a duplex mode.
•
Auto:
The PX3TS selects the optimum
transmission mode through auto-negotiation.
•
Full:
Data is transmitted in both directions
Содержание Raritan PX3TS
Страница 4: ......
Страница 6: ......
Страница 20: ......
Страница 52: ...Chapter 3 Initial Installation and Configuration 32 Number Device role Master device Slave 1 Slave 2 Slave 3...
Страница 80: ...Chapter 4 Connecting External Equipment Optional 60...
Страница 109: ...Chapter 5 PDU Linking 89...
Страница 117: ...Chapter 5 PDU Linking 97...
Страница 440: ...Chapter 7 Using the Web Interface 420 If wanted you can customize the subject and content of this email in this action...
Страница 441: ...Chapter 7 Using the Web Interface 421...
Страница 464: ...Chapter 7 Using the Web Interface 444...
Страница 465: ...Chapter 7 Using the Web Interface 445 Continued...
Страница 746: ...Appendix A Specifications 726...
Страница 823: ...Appendix I RADIUS Configuration Illustration 803 Note If your PX3TS uses PAP then select PAP...
Страница 824: ...Appendix I RADIUS Configuration Illustration 804 10 Select Standard to the left of the dialog and then click Add...
Страница 825: ...Appendix I RADIUS Configuration Illustration 805 11 Select Filter Id from the list of attributes and click Add...
Страница 828: ...Appendix I RADIUS Configuration Illustration 808 14 The new attribute is added Click OK...
Страница 829: ...Appendix I RADIUS Configuration Illustration 809 15 Click Next to continue...
Страница 860: ...Appendix J Additional PX3TS Information 840...
Страница 890: ...Appendix K Integration 870 3 Click OK...
Страница 900: ......


