


Chapter 7: Using the Web Interface
413
4.
In the Script field, select the script that you want it to be started or
stopped when an event occurs.
▪
No script is available if you have not created or loaded it into the
PX3TS.
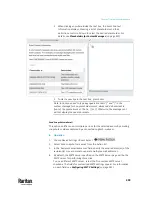
5.
To apply different arguments than the default, do the following. Note that
the newly-added arguments will override this script's default arguments.
a.
Click
.
b.
Type the key and value.
c.
Repeat the same steps to enter more arguments as needed.
▪
To remove any existing argument, click
adjacent to it.
Switch LHX/SHX
This section applies to PX3 only.
If Schroff LHX/SHX Support is enabled, the LHX/SHX-related actions will be
available. See
Miscellaneous
(on page 462).
Use this action to switch the LHX/SHX on or off when, for example,
temperature thresholds are reached.
Operation:
1.
Choose Device Settings > Event Rules >
.
2.
Select 'Switch LHX/SHX' from the Action list.
3.
In the Operation field, select 'Turn LHX/SHX on' or 'Turn LHX/SHX off.'
4.
In the Available LHX/SHX field, select the LHX/SHX device to be turned on
or off. To select all available LHX/SHX devices, click Select All.
To remove any LHX/SHX device from the Selected LHX/SHX field, click that
device's
. To remove all devices, click Deselect All.
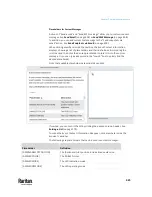
Switch Outlet Group
The "Switch outlet group" action is available only when your PX3TS is
outlet-switching capable. This action turns on, off or power cycles a specific
outlet group.
Operation:
1.
Choose Device Settings > Event Rules >
.
2.
Select 'Switch outlet group' from the Action list.
Содержание Raritan PX3TS
Страница 4: ......
Страница 6: ......
Страница 20: ......
Страница 52: ...Chapter 3 Initial Installation and Configuration 32 Number Device role Master device Slave 1 Slave 2 Slave 3...
Страница 80: ...Chapter 4 Connecting External Equipment Optional 60...
Страница 109: ...Chapter 5 PDU Linking 89...
Страница 117: ...Chapter 5 PDU Linking 97...
Страница 440: ...Chapter 7 Using the Web Interface 420 If wanted you can customize the subject and content of this email in this action...
Страница 441: ...Chapter 7 Using the Web Interface 421...
Страница 464: ...Chapter 7 Using the Web Interface 444...
Страница 465: ...Chapter 7 Using the Web Interface 445 Continued...
Страница 746: ...Appendix A Specifications 726...
Страница 823: ...Appendix I RADIUS Configuration Illustration 803 Note If your PX3TS uses PAP then select PAP...
Страница 824: ...Appendix I RADIUS Configuration Illustration 804 10 Select Standard to the left of the dialog and then click Add...
Страница 825: ...Appendix I RADIUS Configuration Illustration 805 11 Select Filter Id from the list of attributes and click Add...
Страница 828: ...Appendix I RADIUS Configuration Illustration 808 14 The new attribute is added Click OK...
Страница 829: ...Appendix I RADIUS Configuration Illustration 809 15 Click Next to continue...
Страница 860: ...Appendix J Additional PX3TS Information 840...
Страница 890: ...Appendix K Integration 870 3 Click OK...
Страница 900: ......


