


Chapter 8: Using SNMP
519
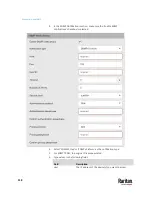
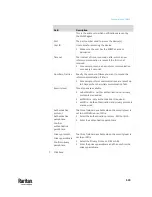
Field
Description
This is the address to which notifications are sent by
the SNMP agent.
Port
The port number used to access the device(s).
User ID
User name for accessing the device.
▪
Make sure the user has the SNMP v3 access
permission.
Timeout
The interval of time, in seconds, after which a new
inform communication is resent if the first is not
received.
▪
For example, resend a new inform communication
once every 3 seconds.
Number of retries
Specify the number of times you want to resend the
inform communication if it fails.
▪
For example, inform communications are resent up
to 5 times when the initial communication fails.
Security level
Three types are available.
▪
noAuthNoPriv - neither authentication nor privacy
protocols are needed.
▪
authNoPriv - only authentication is required.
▪
authPriv - both authentication and privacy protocols
are required.
Authentication
protocol,
Authentication
passphrase,
Confirm
authentication
passphrase
The three fields are available when the security level is
set to AuthNoPriv or authPriv.
▪
Select the authentication protocol - MD5 or SHA
▪
Enter the authentication passphrase
Privacy protocol,
Privacy passphrase,
Confirm privacy
passphrase
The three fields are available when the security level is
set to authPriv.
▪
Select the Privacy Protocol - DES or AES
▪
Enter the privacy passphrase and then confirm the
privacy passphrase
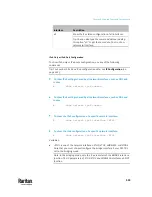
7.
Click Save.
Содержание Raritan PX3TS
Страница 4: ......
Страница 6: ......
Страница 20: ......
Страница 52: ...Chapter 3 Initial Installation and Configuration 32 Number Device role Master device Slave 1 Slave 2 Slave 3...
Страница 80: ...Chapter 4 Connecting External Equipment Optional 60...
Страница 109: ...Chapter 5 PDU Linking 89...
Страница 117: ...Chapter 5 PDU Linking 97...
Страница 440: ...Chapter 7 Using the Web Interface 420 If wanted you can customize the subject and content of this email in this action...
Страница 441: ...Chapter 7 Using the Web Interface 421...
Страница 464: ...Chapter 7 Using the Web Interface 444...
Страница 465: ...Chapter 7 Using the Web Interface 445 Continued...
Страница 746: ...Appendix A Specifications 726...
Страница 823: ...Appendix I RADIUS Configuration Illustration 803 Note If your PX3TS uses PAP then select PAP...
Страница 824: ...Appendix I RADIUS Configuration Illustration 804 10 Select Standard to the left of the dialog and then click Add...
Страница 825: ...Appendix I RADIUS Configuration Illustration 805 11 Select Filter Id from the list of attributes and click Add...
Страница 828: ...Appendix I RADIUS Configuration Illustration 808 14 The new attribute is added Click OK...
Страница 829: ...Appendix I RADIUS Configuration Illustration 809 15 Click Next to continue...
Страница 860: ...Appendix J Additional PX3TS Information 840...
Страница 890: ...Appendix K Integration 870 3 Click OK...
Страница 900: ......


