


Chapter 7: Using the Web Interface
400
Log an Event Message
The option 'Log event message' records the selected events in the internal log.
The default log message generated for each type of event is available in the
section titled
Default Log Messages
(on page 381).
Shut down a Server and Control its Power
The "Power control server" action is available only when your PX3TS is
outlet-switching capable.
You can configure the PX3TS to shut down a specific server and then turn off its
outlet(s), or turn on that server's outlet(s) after a certain event occurs.
The only restriction is a server must be one of the servers being monitored by
your PX3TS and the same PX3TS supplies power to it. To have any server
monitored, see
Monitoring Server Accessibility
(on page 447).
Tip: If the server has multiple power cords, make sure all of its power cords are
connected to the same PX3TS and you have created an outlet group for
controlling all outlets simultaneously. See
Outlet Groups
(on page 239).
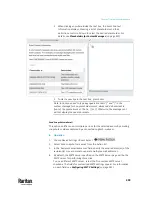
Operation:
1.
Choose Device Settings > Event Rules >
.
2.
Select 'Power control server' from the Action list.
3.
In the Operation field, select an action for the server.
▪
Power up: Turns on the outlet or outlet group associated with the
selected server.
▪
Graceful shutdown: Shuts down the selected server first and then turn
off its associated outlet or outlet group.
4.
Select the server you want in the Server field.
▪
If PX3TS cannot power control any server, a message 'Power control
not configured' is shown in the end of the server's host name or IP
address.
Содержание Raritan PX3TS
Страница 4: ......
Страница 6: ......
Страница 20: ......
Страница 52: ...Chapter 3 Initial Installation and Configuration 32 Number Device role Master device Slave 1 Slave 2 Slave 3...
Страница 80: ...Chapter 4 Connecting External Equipment Optional 60...
Страница 109: ...Chapter 5 PDU Linking 89...
Страница 117: ...Chapter 5 PDU Linking 97...
Страница 440: ...Chapter 7 Using the Web Interface 420 If wanted you can customize the subject and content of this email in this action...
Страница 441: ...Chapter 7 Using the Web Interface 421...
Страница 464: ...Chapter 7 Using the Web Interface 444...
Страница 465: ...Chapter 7 Using the Web Interface 445 Continued...
Страница 746: ...Appendix A Specifications 726...
Страница 823: ...Appendix I RADIUS Configuration Illustration 803 Note If your PX3TS uses PAP then select PAP...
Страница 824: ...Appendix I RADIUS Configuration Illustration 804 10 Select Standard to the left of the dialog and then click Add...
Страница 825: ...Appendix I RADIUS Configuration Illustration 805 11 Select Filter Id from the list of attributes and click Add...
Страница 828: ...Appendix I RADIUS Configuration Illustration 808 14 The new attribute is added Click OK...
Страница 829: ...Appendix I RADIUS Configuration Illustration 809 15 Click Next to continue...
Страница 860: ...Appendix J Additional PX3TS Information 840...
Страница 890: ...Appendix K Integration 870 3 Click OK...
Страница 900: ......


