


Chapter 7: Using the Web Interface
218
Individual Inlet Pages
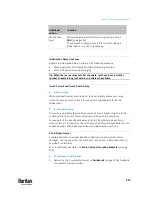
You can view all inlet information, configure inlet-related settings, or reset the
inlet active energy on each individual inlet's page.
Inlet thresholds, once enabled, help you identify whether the inlet enters the
warning or critical level. In addition, you can have PX3TS automatically
generate alert notifications for any warning or critical status. See
Event Rules
and Actions
(on page 375).
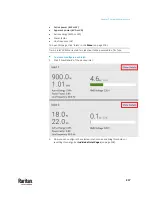
Generic inlet information shown:
•
Inlet power overview, which is the same as
Inlets
(on page 216).
•
A list of inlet sensors with more details. Number of available inlet sensors
depends on the model.
▪
Sensors show both readings and states.
▪
Sensors in warning or critical states are highlighted in yellow or red.
See
Yellow- or Red-Highlighted Sensors
(on page 264).
•
Inlet's power chart, which is the same as
Dashboard - Inlet History
(on
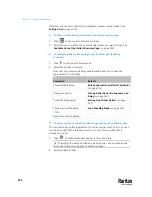
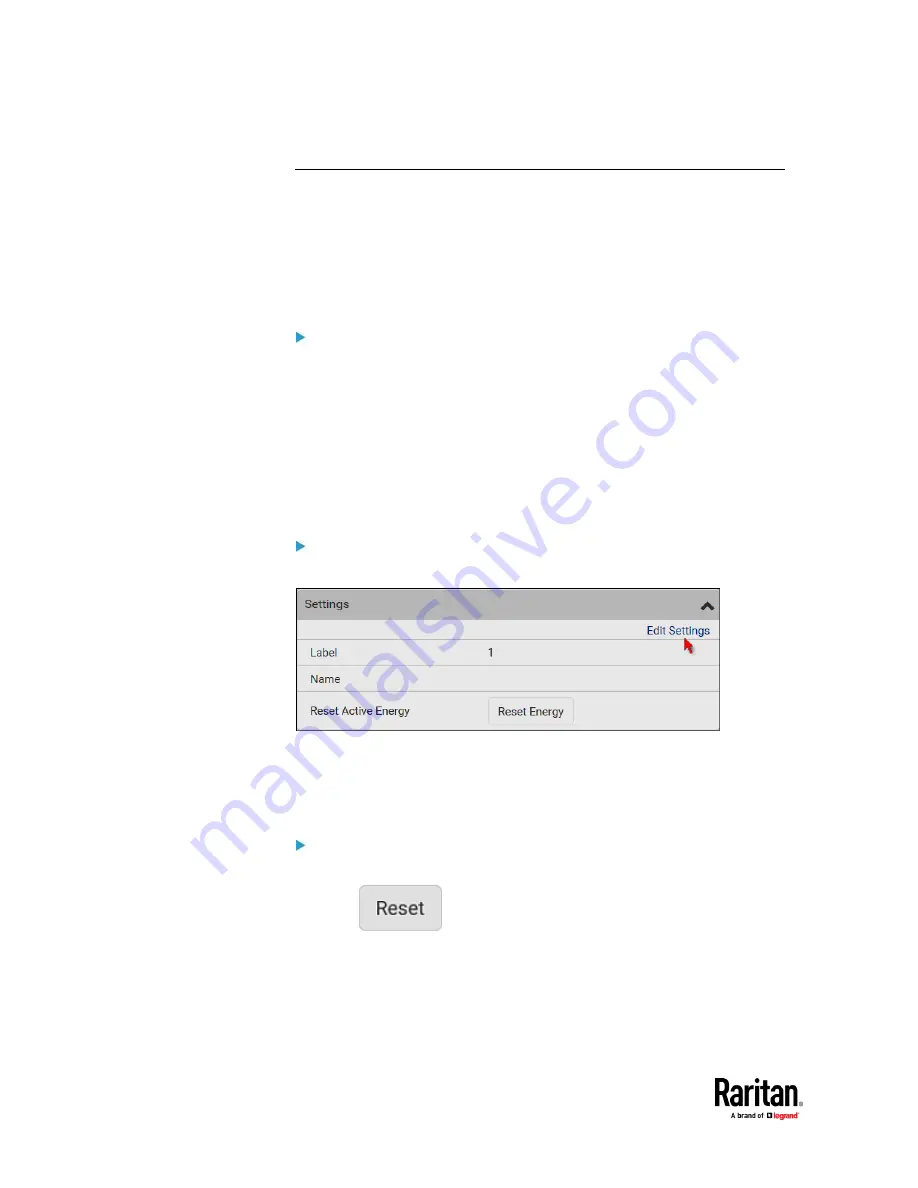
To customize the inlet's name:
1.
Click Edit Settings.
2.
Type a name for the inlet.
▪
For example, you can name it to identify the power source.
3.
Click Save. The inlet's custom name is displayed on the Inlet or Dashboard
page, followed by its label in parentheses.
To reset this inlet's active energy:
Only users with the "Admin" role assigned can reset active energy readings.
1.
Click
.
2.
Click Reset on the confirmation message.
This inlet's active energy reading is then reset to zero.
Содержание Raritan PX3TS
Страница 4: ......
Страница 6: ......
Страница 20: ......
Страница 52: ...Chapter 3 Initial Installation and Configuration 32 Number Device role Master device Slave 1 Slave 2 Slave 3...
Страница 80: ...Chapter 4 Connecting External Equipment Optional 60...
Страница 109: ...Chapter 5 PDU Linking 89...
Страница 117: ...Chapter 5 PDU Linking 97...
Страница 440: ...Chapter 7 Using the Web Interface 420 If wanted you can customize the subject and content of this email in this action...
Страница 441: ...Chapter 7 Using the Web Interface 421...
Страница 464: ...Chapter 7 Using the Web Interface 444...
Страница 465: ...Chapter 7 Using the Web Interface 445 Continued...
Страница 746: ...Appendix A Specifications 726...
Страница 823: ...Appendix I RADIUS Configuration Illustration 803 Note If your PX3TS uses PAP then select PAP...
Страница 824: ...Appendix I RADIUS Configuration Illustration 804 10 Select Standard to the left of the dialog and then click Add...
Страница 825: ...Appendix I RADIUS Configuration Illustration 805 11 Select Filter Id from the list of attributes and click Add...
Страница 828: ...Appendix I RADIUS Configuration Illustration 808 14 The new attribute is added Click OK...
Страница 829: ...Appendix I RADIUS Configuration Illustration 809 15 Click Next to continue...
Страница 860: ...Appendix J Additional PX3TS Information 840...
Страница 890: ...Appendix K Integration 870 3 Click OK...
Страница 900: ......


